

A filler pull out spice rack and an in-cabinet organizer may look similar in a retail search, but they are different installation architectures. A filler module is designed for a gap between adjacent cabinets and may have its own supports and finished front. An in-cabinet rack fits inside an existing cabinet and depends on that cabinet’s clear opening and internal mounting surfaces. Buyers should identify the architecture before selecting width, asking for a quote or approving a sample.
This distinction is practical for importers and private-label product teams because the installation drawing, component ownership and fit criteria change with the architecture. The examples in this article are conceptual illustrations, not Koitor SKUs. Koitor does not claim to make wooden cabinets, cabinet fronts or proprietary filler-slide systems.
How do filler pullouts and in-cabinet racks differ?
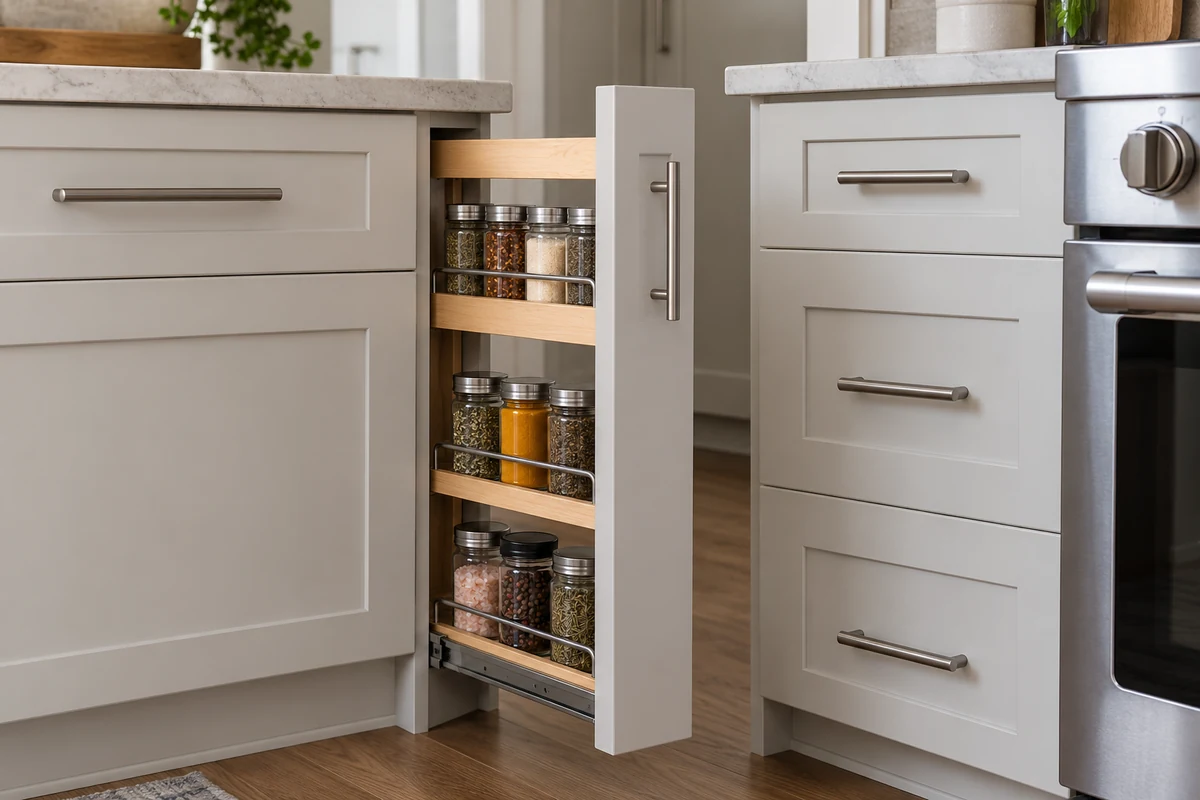
A filler pullout occupies a narrow space between cabinet boxes. Depending on the design, it may attach to adjacent cabinets or a dedicated frame, use a finished front panel, and include its own moving shelves or basket supports. The cabinet opening around the module is part of the product installation. Buyers must understand where its structural support comes from and which party supplies the front, slides, fasteners and alignment features.
An in-cabinet rack is installed within an existing cabinet opening. It may rest on a shelf, attach to cabinet sides, hang from an existing shelf or connect to a specified mounting surface. The cabinet interior provides the surrounding geometry. Its usable width and depth are therefore governed by the clear opening after hinges, face frames, door hardware and other obstructions are considered.
Rev-A-Shelf’s application guidance distinguishes filler accessories mounted between cabinets, where there is no interior cabinet, from normal cabinet applications. That manufacturer-specific explanation supports the architectural distinction; it does not establish a widespread buyer misconception or define a universal installation standard. The linked base accessory information and cabinet applications should be read with the selected supplier’s current product drawing. Direct page access was restricted during this review, so no unavailable installation dimensions are quoted here.
Why is a narrow width not a sufficient specification?
The same nominal width can refer to different measurement points: outside frame, clear opening, usable shelf width or finished-front width. A buyer may send a gap dimension and expect a rack to fit, while the supplier may quote the width of the metal basket only. The product can then fail to align with the surrounding cabinets even though the quoted shelf width appears correct.
For a filler module, establish the available gap between the adjacent cabinet sides, the module’s external envelope, the front-panel dimension and the support or fixing positions. Also note the floor, plinth, countertop and neighboring door conditions if they affect insertion or travel. For an in-cabinet rack, record the clear interior width and depth at the mounting level, the opening height, shelf thickness and obstructions such as hinges or a center stile. A filler pull out spice rack quote should state which of these dimensions controls its fit.
Do not assume that a retail category name tells the installer which supporting surfaces to use. Request an installation section or assembly drawing that shows both the organizer and the cabinet around it. If the organizer is compatible with only certain mounting constructions, list those conditions before making a product-page promise.
Which installation inputs belong in the RFQ?
An RFQ should define the cabinet condition and measurement method as clearly as the organizer itself. Use a sketch or drawing with reference points and identify whether dimensions are nominal, measured clear openings or finished-part sizes. For the filler version, include the gap and neighboring cabinet arrangement. For the internal version, show the cabinet box and the mounting surface available to the rack.
| Input | Filler pullout | In-cabinet organizer |
|---|---|---|
| Installation location | Gap between adjacent cabinet units | Interior of an existing cabinet box |
| Primary width | Available gap and module/front external envelope | Clear interior opening at the rack’s mounting level |
| Support | Adjacent cabinet sides or dedicated system, as designed | Cabinet shelf, sidewall or other stated internal support |
| Front interface | Finished front, alignment and reveal may be relevant | Existing cabinet door and frame may limit access |
| Depth and travel | Module depth and extension path into the room | Usable cabinet depth and clearance behind the door |
| Responsibility | Identify module, front, slides and cabinet fixing scope | Identify organizer, fasteners and compatible cabinet surface |
Ask the supplier to flag missing information instead of choosing assumptions silently. If the intended cabinet is not yet built, provide a representative mock-up or confirm the design’s cabinet interface before ordering the sample. If the module uses a bought-in slide or front, state whether the supplier or buyer sources it and who approves the final interface.
What should the drawing show about support and the finished front?
For a between-cabinet filler module, the drawing should show how the assembly is supported, where it attaches, how the moving part travels and how the finished front aligns with adjacent doors or panels. Clarify whether the front is part of the module, supplied by the cabinet maker or prepared by another party. Record the required reveal or alignment expectation as a project-specific dimension rather than assuming a universal cabinet standard.
For an internal rack, the drawing should show the mounting method and the cabinet surfaces that carry the organizer. Identify any required shelf, brackets, side clearances or supplied fasteners. A rack that rests on an existing shelf is not interchangeable with one that attaches to the cabinet wall. Make sure the product listing, installation guide and package contents describe the same arrangement.
The metal organizer supplier may be responsible for a wire basket or frame while the cabinet manufacturer controls the box and finished front. Separate those roles in the specification. A clear responsibility matrix helps prevent a fitting issue from being attributed to the wrong component before the actual interface is inspected.
How should a buyer inspect an in-cabinet organizer sample?
Use the cabinet construction and clear opening that the product is intended to fit. Measure the interior at the actual mounting level, including any face frame, hinge, shelf edge or door obstruction. Assemble the rack using the intended fasteners and follow the supplier’s installation instructions. Check that the unit can be installed, loaded and removed or adjusted as specified.
For a filler module, use a mock-up or representative adjacent cabinets with the actual gap, front and support conditions. Confirm that the module aligns, travels through its intended path and does not interfere with neighboring doors or handles. A loose rack on a workbench cannot verify a finished-front integration.
The image below shows an illustrative in-cabinet review. For a real approval, retain the cabinet drawing, organizer revision, sample identity and measurements taken. A visual sample check supports fit review only; it does not establish load capacity, cycle life or compatibility with all cabinets.

What should buyers include in the responsibility matrix?
List each component and identify who supplies, installs and approves it. The matrix should cover the metal rack or module, mounting brackets, slides, fasteners, finished front, cabinet box, instructions and packaging. If a component is optional, give it a distinct item or configuration so a sample cannot be approved without the part that affects fit.
For a filler pullout, identify whether support is provided by the adjacent cabinet structure or by an independent frame. For an in-cabinet rack, identify the internal mounting surface and any required pre-existing shelf. Record who confirms compatibility with the finished cabinet and who is responsible for checking the assembled interface.
| Component or decision | Supplier / buyer responsibility to assign | Approval evidence |
|---|---|---|
| Metal rack or basket | Define manufacturing and revision owner | Drawing and identified sample |
| Slides or moving hardware | Identify source and compatibility owner | Product data and assembled movement review |
| Cabinet side or shelf | Identify cabinet maker and reference dimensions | Cabinet drawing or representative mock-up |
| Finished front | Name supplier and alignment reference | Front dimensions and sample fit |
| Fasteners and brackets | Confirm inclusion and installation method | BOM and instructions |
| Packaging | Confirm protection and component grouping | Pack-out sample and contents list |
Keep the matrix consistent with the quotation and product page. If the buyer supplies the cabinet front or slides, state what the organizer supplier needs from that component owner to verify compatibility. Avoid calling the system “universal” unless a defined set of installation interfaces and evidence support that claim.
Which changes require another fit review?
Recheck the interface if the gap width, cabinet sides, face frame, front panel, rack mounting points, shelf thickness, slide or fastener changes. Also reassess if the product moves from one architecture to the other. A basket adapted from an internal rack does not automatically become a filler module because its external width is similar.
Record the accepted drawing revision and identify any cabinet construction or dimensions that were not represented in the sample. If a replacement component is proposed, ask the responsible supplier to compare the interface and state whether a new sample is needed. Preserve the approval record with the BOM and installation instructions for repeat orders.
What should the quotation and product page say?
Name the installation architecture explicitly: between-cabinet filler module or in-cabinet organizer. State the relevant measurement reference, installation supports, included components, required cabinet conditions and any exclusions. If only the organizer is sold, make clear whether cabinet front, cabinet box, slide or fasteners are included.
Product copy for a filler pull out spice rack should avoid implying the two types are interchangeable or that one external width fits all cabinet systems. A concise fit statement should refer to the specified clear opening or gap and indicate what the buyer must verify. A supplier quotation can help by showing a dimensioned layout and recording unresolved assumptions before a purchase order is released.
When a project requires specialized slides or finished cabinetry, coordinate with the party responsible for those systems. A metal rack manufacturer can discuss metal-part geometry within confirmed capabilities, but should not be represented as the cabinet or slide-system designer unless that scope is documented.
Where can Koitor help with an adjacent storage project?
Koitor Hardware is a family-owned custom metal hardware factory focused on bathroom and home-storage hardware. Its drawing- and sample-based communication can support a discussion of metal rack fabrication and assembly interfaces within confirmed scope. This article does not establish current manufacture of complete filler modules, wooden cabinet boxes, finished fronts or proprietary slide systems.
Share the installation architecture, cabinet drawings, clear opening or gap measurements, required metal components, finish and responsibility matrix for a sourcing discussion. A home-storage OEM conversation can clarify possible metal-part scope; buyers can also contact Koitor about a project. The final fit must be confirmed with the supplier responsible for the complete installation system.
Frequently asked questions
Is a filler pullout installed inside a cabinet?
Not necessarily. The filler application described by Rev-A-Shelf is mounted between cabinets, where there is no interior cabinet box. Confirm the architecture for the exact supplier product and installation drawing.
Can an in-cabinet rack be installed in a narrow gap between cabinets?
Only if its design and mounting method are intended for that arrangement. Similar width does not make the support or finished-front interfaces compatible. Ask the supplier to identify the installation architecture.
Should buyers measure cabinet width or clear opening?
Use the measurement relevant to the architecture. For a filler module, define the available gap and the module envelope. For an internal rack, measure the usable opening at its mounting level and account for obstructions.
Does a sample fit in one cabinet prove universal fit?
No. It shows the specific rack and cabinet configuration reviewed. Record the cabinet construction, dimensions, mounting method and any untested conditions.
Who supplies the finished front and slides?
That depends on the project scope. State the owner of each component in the RFQ, quotation and BOM, and identify who approves the assembled interface.
What should change control preserve?
Retain the accepted rack and cabinet revisions, mounting method, component responsibility, sample observations and installation instructions. Review any change to the gap, front, support or slide before repeat production.
Discuss a Metal Organizer Project With Koitor
Share your cabinet drawings, installation architecture, required metal rack components and interface responsibilities. Confirm cabinet, front and slide scope with the relevant system supplier.
OEM / PRIVATE LABEL
Turn this sourcing guide into a product brief
Share your target product, size, finish, order quantity and packaging requirements. Your team receives a practical manufacturability review before quotation.

 English
 Español
 Português
 Français
 Deutsch
 العربية