
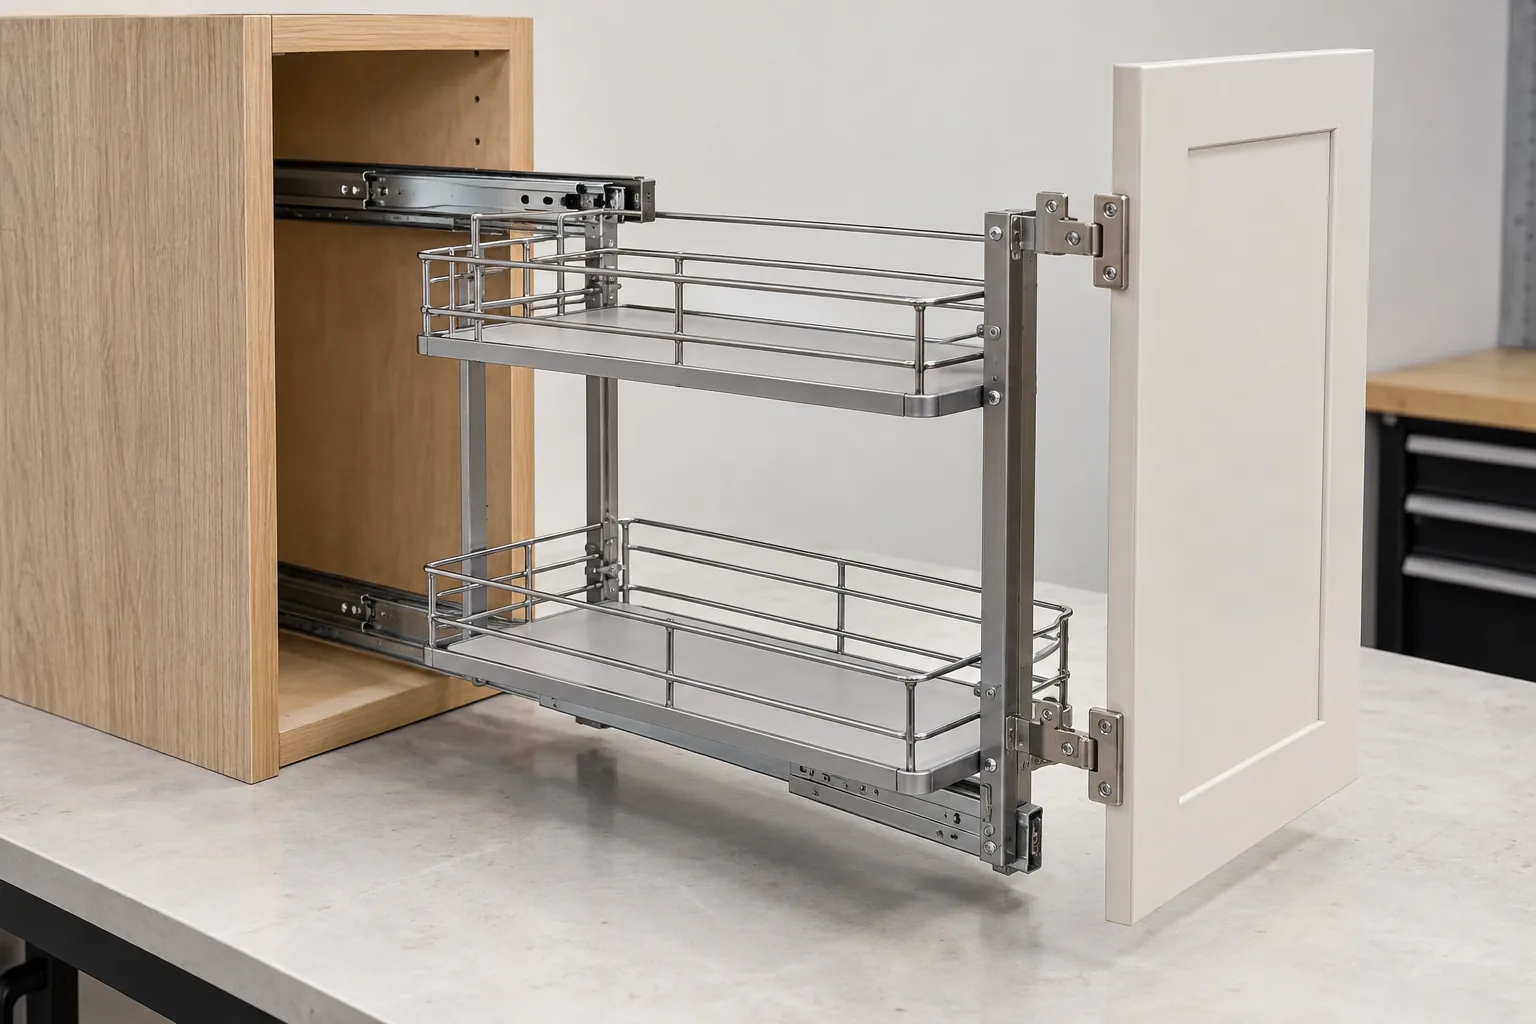
A door-mounted pull-out organizer creates a direct interface between a moving cabinet front and a loaded storage frame. The brackets must attach in a suitable region of the door, clear hinges and handles, and maintain the intended relationship as the door opens. Buyers should not select pull out cabinet door mounting brackets from an adjustment label alone. They need the door section, bracket envelope, organizer geometry, hinge arrangement, and sample evidence in one controlled review.
A product listing can describe adjustable door-mount brackets, but the actual adjustment range belongs to that specific organizer and installation system. Rev-A-Shelf’s 448 Series provides a manufacturer example of a door-mounting arrangement for a named product. It supports asking for the exact bracket and its adjustment documentation; it does not establish compatibility with a different cabinet or basket. See the Rev-A-Shelf 448 Series reference.
Why Is Bracket Adjustment Only Part of the Fit?
An adjustment feature can help align an organizer to a particular door, but it cannot create a safe or suitable attachment surface where none exists. Cabinet doors may include stiles and rails, a center panel, a frame, hinges, a handle, decorative trim, or a flexible substrate. The bracket’s contact points must be assessed against the actual construction and the supplier’s intended installation method.
The organizer also moves with the door. Its frame and contents can approach the cabinet side, shelf, hinge arm, or adjacent opening as the door swings. Therefore, checking only whether the bracket can be fixed to the panel leaves out the moving envelope. The system must be reviewed closed and open, including the organizer’s actual position on the door and the parts it carries.
Some product systems include brackets with a defined adjustment envelope. That range is useful only when the door structure and mounting method fall within the manufacturer’s instructions. Do not treat “adjustable” as a substitute for identifying where each bracket lands, which fixing parts are used, and how the setting is retained. Ask the organizer supplier to confirm the actual door and cabinet application.
What Should the RFQ and Drawing Show?
Provide a front elevation and door section with the stiles, rails, panel, joints, hinge locations, handle, and any trim. Identify the finished door dimensions, construction, and the permitted attachment areas. Show the organizer frame, basket depth, mounting-bracket locations, and its path during door movement. If the bracket uses a separate screw, clamp, plate, or adapter, identify the exact part and source.
Specify the adjustment range from the product supplier’s documentation if available; do not estimate it from a photograph. Ask which dimensions are adjustable and which must be fixed by the door or organizer drawing. Also clarify whether the brackets are installed before or after the cabinet door is hung and whether the chosen configuration requires access to the inside of the cabinet.
| Drawing or RFQ input | Buyer evidence | Supplier confirmation |
|---|---|---|
| Door structure | Stile, rail, panel, frame, thickness, and finish | Suitable attachment areas and installation method |
| Bracket identity | Part number, orientation, fasteners, and instructions | Model-specific adjustment and application limits |
| Organizer | Frame width/depth, basket positions, and attachment points | Compatibility with the door-mount kit |
| Hinge and handle | Models, locations, projections, and opening path | Clearance and any required mounting offset |
| Use condition | Intended access, contents envelope, and service needs | What the sample should demonstrate |
| Approval control | Drawing revision, parts list, and sample code | Substitution and change-review requirements |
If the door vendor and organizer vendor are different, assign one party to coordinate the combined drawing. The door supplier can confirm its construction; the organizer supplier can confirm its kit; the buyer or nominated integrator must confirm that both fit the final cabinet. Do not treat independent component approvals as system acceptance.
How Should Buyers Compare Bracket Proposals?
Compare the bracket position and fixing method against the door construction. A bracket attached to a broad frame member may have different constraints from one mounted to a center panel. A kit may use more than one attachment point or permit adjustment in a particular direction. The actual arrangement is product-specific. Ask the supplier to show the bracket locations and allowable settings on the drawing rather than describing them only in the quotation.
Include installation and service access in the comparison. If a bracket must be tightened from the cabinet interior, confirm that tools can reach it after the organizer is installed. If a door must be removed for installation, include that operation and its effect on assembly time. Ask whether the adjustment remains accessible after the basket is loaded or whether it should be completed during installation.
Review the bracket against the cabinet hinges. Even if the organizer attaches to the door, a mounting plate, hinge arm, or screw head could conflict with the bracket or basket. Check the full door swing and basket envelope. Do not solve an interference by moving a bracket outside its documented adjustment range without supplier approval.
Commercially, compare the complete kit, not the bracket line item alone. Include fasteners, spacers or adapters where specified, installation steps, instructions, packaging, and spare-part identification. A more adjustable system may provide useful flexibility but could introduce more assembly variables. A fixed system may simplify installation if the door geometry is stable. Choose based on the buyer’s actual assortment and quality-control plan.
Pull out cabinet door mounting brackets should be sourced with the organizer and door geometry identified together, so the adjustment range has a clear reference.
What Must a Representative Sample Confirm?
Use the production-intent door construction, organizer, bracket kit, hinges, handle, and cabinet interior. Confirm the bracket contacts the intended areas and is installed according to the supplier’s instructions. Check alignment and whether the adjustment can bring the organizer into the required position without interfering with stiles, rails, hinges, or other fittings.
Open and close the door with the organizer installed. Observe whether the basket or frame contacts the cabinet side, shelves, hinge hardware, adjacent doors, or the handle. Test the intended access sequence and confirm that the basket can be reached, loaded or removed as designed. If there are several basket levels, inspect each one through the motion path rather than only the top shelf.
Record the adjustment state and fastener configuration. The sample should show whether the kit uses all required fixing points and whether any proposed spacer or alternative screw is an approved component. Photograph the inside and outside of the door and capture the bracket-to-frame location. Those records help the buyer inspect production without relying on a visual front view alone.
A fit sample does not establish a load rating or long-term performance. If the organizer’s intended contents or repeated opening introduce additional requirements, agree the test conditions and acceptance criteria with the product supplier. Do not infer payload capacity from bracket appearance or from a static display sample.

What Can Invalidate Bracket Approval?
A new door construction can move or remove the bracket’s suitable attachment area. A change from framed to slab construction, a revised stile width, a new handle, or a different hinge plate can change the fit. An organizer substitution can move the basket or alter its depth. Record those inputs in the approved configuration and screen changes before releasing another order.
The adjustment envelope should be part of the sample record, but so should its limits. If a sample only fits at the extreme of the supplier’s range, ask whether that is approved for the intended door and whether production variation leaves enough setup margin. Do not assume that unused adjustment is always safer or that the center setting is automatically correct; follow the supplier’s application guidance.
When a sample has a problem, preserve the original configuration and observation before revising it. Note which bracket, door area, or nearby component caused interference. Then have the relevant supplier propose a documented correction. This approach avoids simultaneous changes to the bracket, hinge, and organizer that make it unclear which revision solved the issue.
For a retailer or distributor managing multiple cabinet sizes, maintain a configuration table. Each row should identify the organizer, door type, bracket kit, hinge arrangement, and sample reference. Mark which entries share a verified configuration and which remain preliminary. This helps buyers compare assortment coverage without assuming one sample validates every door style. It also gives service teams a traceable part combination if an installer reports that a bracket cannot reach its intended position.
The mounting area should be reviewed against structural and visual requirements. A bracket may occupy a space hidden by a shelf when the door is open but visible when closed, or it may cover a joint that the door supplier needs to inspect. Identify cosmetic surfaces and no-drill zones on the drawing. The panel supplier should confirm attachment constraints for its construction; an adjustment feature does not establish that a chosen surface is suitable.
If installation occurs at a distribution center or by an end installer, specify the information that accompanies the product. Include bracket orientation, approved fasteners, adjustment steps from the supplier, and the matching organizer code. If the buyer requests a diagram, it should depict the same model and revision as the approved sample. Generic instructions can mislead when bracket layouts or door types differ.
Include pull out cabinet door mounting brackets in the final bill of materials by supplier code and approved revision.
The buyer should decide how to handle a door that falls outside the documented range. The instruction should say whether a different organizer kit is available, whether the door must be changed, or whether the application is outside scope. Do not encourage improvised fasteners or new holes. Keeping the boundary explicit makes technical support more consistent and keeps unapproved modifications out of the product specification.
This boundary is especially useful when the product is sold into several cabinet brands with different door constructions. Ask the organizer supplier for the conditions it can confirm and keep unsupported combinations marked as unapproved.
Before release, ensure purchasing, assembly, and service teams use the same kit code and drawing revision. This avoids mixing an approved adjustment range with a different bracket set.
For repeat orders, put the kit code and installation sequence into the product specification. Include a drawing showing fastener positions and a clear callout for any parts that must not be substituted. If a factory uses a locally sourced equivalent, require written review because thread, head geometry, length, or material may affect fit and appearance. The buyer should define what evidence is needed to approve that change.
Door-Mounted Organizer Approval Checklist
- Door construction and approved bracket-contact zones are dimensioned.
- Bracket kit, orientation, fasteners, and supplier instructions are identified.
- Adjustment direction and limits come from the actual product documentation.
- Hinge, handle, basket, and cabinet opening appear on the same assembly drawing.
- Full opening and organizer access are reviewed with production-intent parts.
- Sample record includes settings, fasteners, photos, deviations, and approver.
- Changes to door, kit, hinge, handle, or organizer trigger a fit review.

Häufig gestellte Fragen
Do adjustable brackets fit any cabinet door?
No. Adjustment is limited by the specific kit and door construction. Confirm the attachment zones and instructions with the supplier.
Can the bracket be mounted on a center panel?
Only if the door construction and kit instructions support it. The supplier should confirm the panel and fixing method.
Should adjustment be made after the organizer is loaded?
Follow the product supplier’s instructions. The sample review should represent the expected use and assembly sequence; do not invent a setup procedure.
Is a static sample enough to prove the bracket capacity?
No. It shows the reviewed fit. Load or durability performance requires separate evidence and agreed criteria.
What should be recorded for future orders?
Record the organizer and bracket codes, door construction, hinge and handle positions, adjustment, fasteners, drawing revision, and approved sample.
Arbeiten Sie mit Koitor Hardware zusammen
Koitor’s verified work covers metal bathroom and home-storage hardware, drawing and sample coordination, basic assembly, finish coordination, and supplier communication. Specialist cabinet door organizers and their brackets must be confirmed by the relevant component supplier. If a metal basket or accessory interfaces with a door-mounted organizer, share the drawing or sample and the specific fit question.
Check the door-mount interface before approval
Share the door section, bracket kit, hinge layout, and organizer drawing to coordinate a representative sample review.
OEM / EIGENE MARKE
Verwandeln Sie diesen Beschaffungsleitfaden in ein Produktdossier
Teilen Sie uns Ihr Zielprodukt, die Größe, die Oberflächenausführung, die Bestellmenge und Ihre Verpackungsanforderungen mit. Ihr Team erhält vor der Angebotserstellung eine praxisorientierte Prüfung der Herstellbarkeit.


 English
 Español
 Português
 Français
 Deutsch
 العربية