
Buyer specification guide | Concealed towel-bar mounting
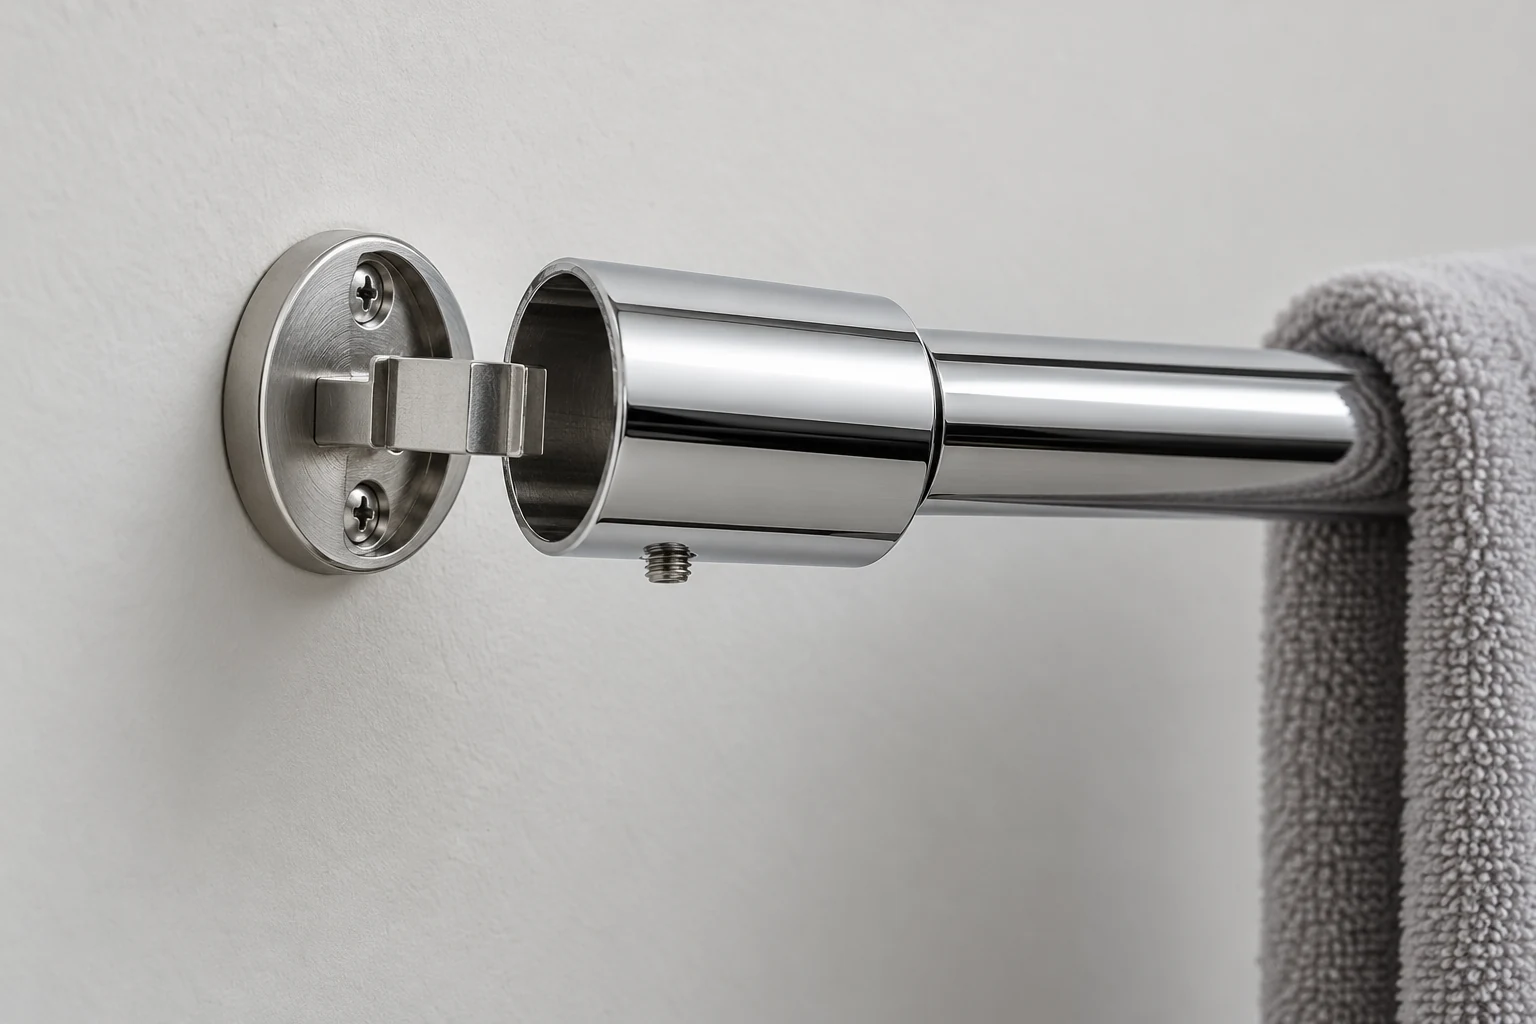
When a concealed towel-bar post loosens, the wall plate may still be firmly attached. The failure can be at a different interface: the post may not seat fully, the set screw may miss its bracket seat, or a thin bracket lip may deform. A buyer sourcing a towel bar mounting bracket set screw assembly should define bracket profile, post insertion depth, screw contact location and tool access, then inspect those details on a production-intent sample. Check wall fastening separately so a post-retention issue is not mistaken for an anchor problem.
How can a towel-bar post loosen when its wall plate remains?
A typical concealed mount uses a wall-fixed plate or bracket, a decorative post that fits over it, and a set screw that retains the post. The screw needs to contact a suitable area of the bracket or post seat. If the parts are misaligned, the post is only partly engaged, or the screw cannot reach the intended surface, it may feel secure during assembly and later wobble or detach.
Users have reported problems such as a bracket lip deforming or a bent wall bracket no longer retaining the set screw. See the reported bracket-lip slip and a separate bent-bracket report. These discussions establish real use questions, not a defect rate or a diagnosis for every loose towel bar. The wall fixing, bracket profile, post and screw all need to be inspected before assigning a cause.
Manufacturer instructions show the component relationship. Bradley’s towel-bar instructions identify a bracket and locking set screws; Moen’s hand-towel-bar specification also documents a set-screw and bracket assembly. These are model-specific examples. They do not set a universal bracket shape, screw size, tightening torque or performance claim for another product.
For an importer, the useful question is: Can the post seat completely over the specified bracket, and does the screw engage the intended seat in a way that is inspectable and serviceable? This is a sample and drawing question as much as a hardware-choice question.
Separate the wall interface from the post interface
The wall interface transfers force from the mounting plate into the specified wall or substrate through screws, anchors or another fastening arrangement. The post interface retains the decorative post on the bracket. A wall plate that moves may point toward the first interface; a plate that stays fixed while the post wobbles may point toward the second. This distinction guides inspection but does not by itself prove the root cause.
Do not ask a supplier to solve every loose-post complaint by changing the wall anchor. First record which part moves. Check whether the plate is stable, whether the bracket is bent, whether the post reaches its intended stop and whether the screw tip contacts the bracket seat. The chosen wall fastener must still match the target installation and applicable instructions, but it is a separate decision from post-to-bracket engagement.
The distinction also matters in replacement kits. A buyer may need a post, wall bracket, screw, anchor or a matched set. A spare set screw cannot repair a deformed bracket, and a bracket replacement may not correct an incompatible post bore. Identify components and revisions in the bill of materials and spare-parts listing.
What should the buyer specify on the drawing?
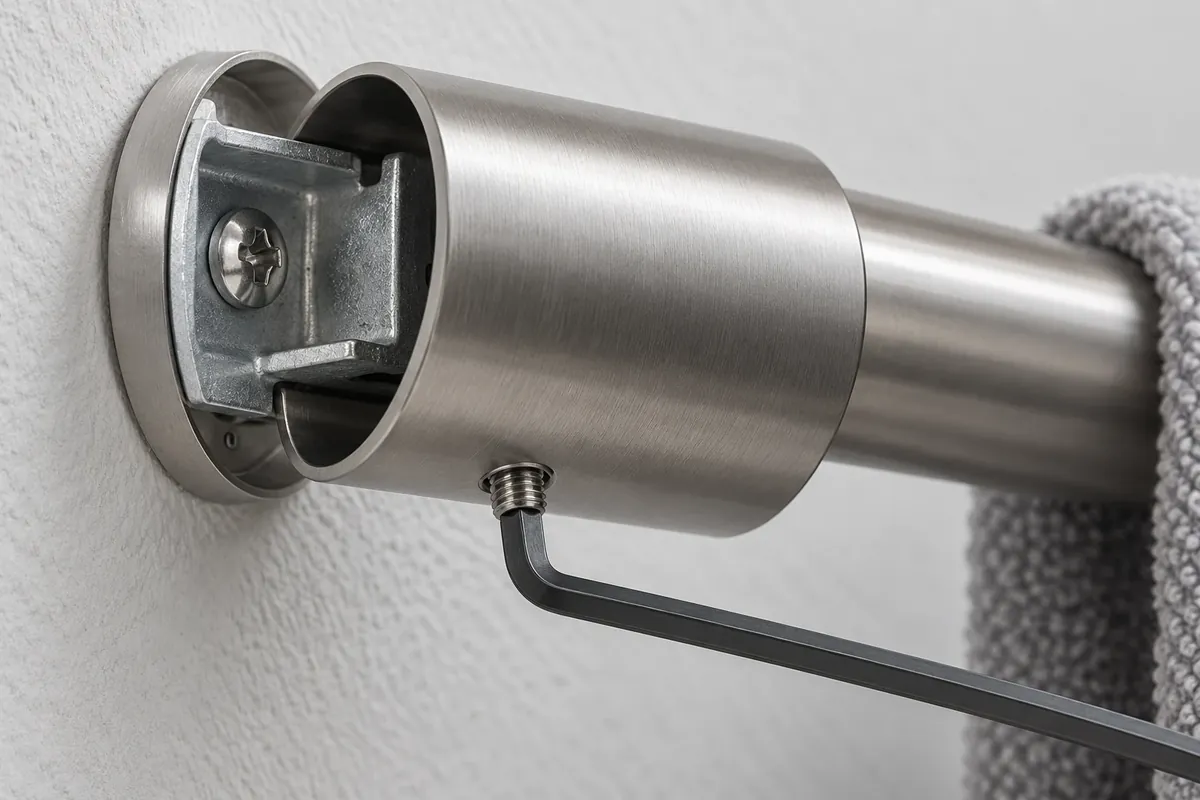
Show the wall plate, bracket profile, post sleeve, screw hole and set-screw contact surface in an assembled view and a section or exploded view. Identify the orientation of the bracket and whether the post can be installed upside down or rotated. Dimension the post’s seating depth from a stable datum and show the screw’s position relative to the bracket seat. A front view alone may hide the retaining interface.
The screw needs practical access after the post is mounted. If the opening faces downward, confirm the intended tool can reach it without striking the wall or rail. Identify the drive type and screw length in the part list. The drawing should not rely on an installer guessing where the tip lands. If the bracket has a lip, notch, flat or pocket, show it clearly and specify the intended engagement surface.
Avoid inventing universal dimensions. The proper profile and thread depend on the specific product design, materials and installation requirements. Request the supplier’s proposed dimensions and review them against the post and bracket sample. The buyer’s drawing should capture the approved geometry rather than copying a branded mounting part without permission or evidence.
Para un towel bar mounting bracket set screw specification, the seat must be reachable and the post must reach its intended stop before the screw is tightened. A screw that bottoms out against the post wall before engaging the bracket can feel tight without retaining the assembly. A very short screw may not reach the seat; an overly long screw may mark or damage a surface. Confirm the contact point and approved assembly method on the actual parts.
| Interface detail | What to define | What the buyer should verify |
|---|---|---|
| Wall plate | Hole pattern, plate orientation and substrate instructions | Plate sits as intended and remains stable under the specified installation |
| Bracket | Lip, flat, notch or screw seat profile | Profile is not bent and aligns with the post bore |
| Post sleeve | Insertion depth, internal clearance and orientation | Post reaches the intended seating stop |
| Set screw | Drive, length, tip form and access direction | Tip contacts the designated seat rather than an unintended surface |
| Replacement parts | Part ID and compatible revision | Service kit matches the approved bracket and post |
These are drawing prompts, not universal acceptance dimensions or torque instructions.
Check engagement depth and tolerances together
The post bore, bracket thickness, screw projection and seat location form a tolerance stack. A bracket can be made to its own dimensions while still being difficult to retain if the post bore or screw hole shifts. Ask the supplier to identify the dimensions that control engagement and how they will be checked. The sample should use the final-intent post, bracket and screw, not a visually similar combination assembled by hand.
Check more than one sample position where the design or fixture can vary. Confirm that the screw enters the opening, reaches the seat and can be tightened with the stated tool. Look for cross-threading, poor alignment, excessive gap, visible post tilt or a screw tip that rides off the bracket. Record observations rather than relying on “feels tight.” If a retaining lip is thin or bent, document that condition and request a design review; do not prescribe a thicker bracket without engineering context.
The finish can affect clearances and contact surfaces. Inspect whether plating or coating buildup interferes with sliding the post over the bracket or changes screw access. The finish should remain acceptable after assembly and normal service, but do not claim that appearance alone proves retention or durability.
How should a production-intent sample be reviewed?
Use an identified sample with drawing revision, part numbers and the assembly instructions intended for production. Install the wall plate using the specified procedure on an appropriate sample panel or target substrate. Then fit the bracket and post in their correct orientation. The purpose is to observe component engagement and service access; this editorial sample checklist is not a structural load test or certification.
Before tightening, verify that the post reaches its intended stop and that the screw opening aligns with the bracket seat. Insert the correct tool and follow the supplier’s approved instruction. If a tightening torque is specified, it must come from the design owner or an appropriate validated procedure; this guide does not supply a torque value. Observe whether the post remains aligned and whether the screw bears on the intended surface. Do not force a misaligned screw into place.
After assembly, assess whether the post can be removed and reinstalled as intended for service. Look for deformation of the bracket lip, stripped threads, screw damage, finish marks or changes in post movement. If the product is sold as a pair, inspect each post independently. A single successful assembly does not prove every production unit will behave the same way, so the buyer should agree process controls and inspection sampling appropriate to the project.
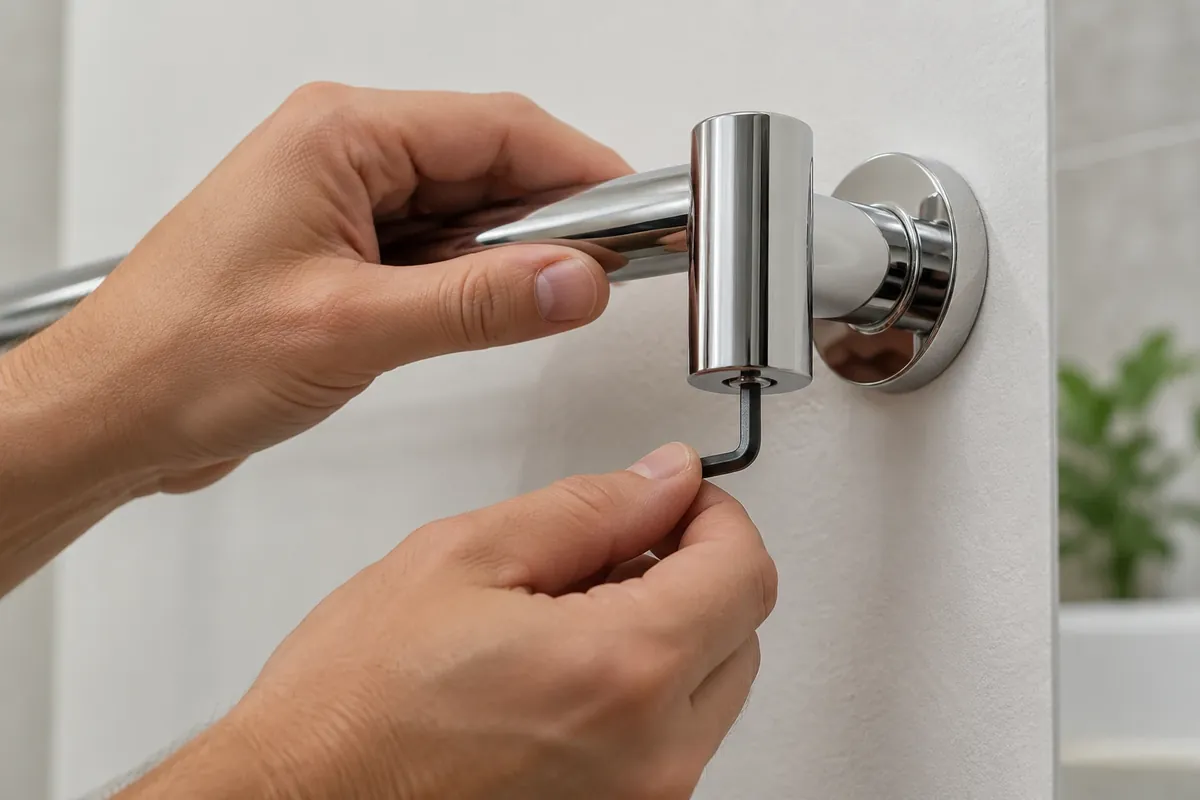
Record the following: sample ID, revision, plate installation method, bracket orientation, screw part, tool used, whether the post reached its stop, visible contact, post movement and any observed damage. Photographs of the assembled and disassembled interface make the approval easier to repeat. If a result is conditional, state exactly which change or verification remains open.
Do not confuse tightness with retention
A fastener can feel tight for the wrong reason. It may bind in a threaded hole, bottom out before reaching the bracket or press into a decorative post wall. Likewise, a post may resist movement because of friction even though the intended set-screw engagement is missing. The buyer should verify the contact position and assembly geometry, not rely only on hand feel.
Avoid adding threadlocker, prescribing a torque or changing screw point style without design-specific approval. Those changes can affect serviceability, finish, bracket deformation and replacement parts. If repeated loosening is observed, capture the failed parts and identify the movement and contact evidence first. Then the product owner and supplier can determine whether the cause relates to geometry, materials, assembly, wall fixing or use conditions.
How should the spare-parts and service plan work?
For private-label products, list the screw, bracket and post as identifiable components. A service kit should state which product revision it fits and whether it contains the correct drive tool or instructions. If multiple bracket generations look similar, do not rely on visual resemblance alone. Use dimensions, part identifiers or an approved compatibility record to prevent an incompatible screw from being supplied.
Ask the supplier to package small retaining screws so they do not disappear or mix across products. The instructions should show the screw location and tool direction clearly. If the screw is intentionally hidden from view, provide service information that helps a technician reach it without damaging the finish. If the post is not intended to be removed by the end user, state that limitation in product documentation.
The replacement plan also feeds quality traceability. Record the screw and bracket part revisions alongside the finished bar set. If the bracket profile, screw thread, tip or post bore changes, review whether the existing service kit remains compatible. A new post may require a new screw even if the external bar appearance is unchanged.
De Koitor’s custom bathroom towel-rack manufacturing context supports a buyer discussion about metal bathroom hardware, assembly interfaces and sample review. It does not establish that Koitor uses the exact bracket shown in the images or the proprietary designs in the cited manuals. Confirm the actual product, materials and component ownership for each RFQ.
Buyer checklist before approving a towel-bar assembly
Treat towel bar mounting bracket set screw engagement as a defined interface requirement on the approved drawing and sample record.
- Separate wall plate anchoring from post-to-bracket retention.
- Identify which part moves when a user reports a loose towel bar.
- Show bracket profile, post bore, screw opening and seat in drawing views.
- Define post seating depth and correct bracket orientation.
- Specify screw part, drive access and approved assembly instruction.
- Verify on a production-intent sample that the post reaches its stop.
- Confirm the screw tip engages the intended bracket feature.
- Inspect bracket lips, threads, screw condition and finish after assembly.
- Record sample ID, revision, tool used and interface photographs.
- Assign part numbers and revisions to replacement screws and brackets.
- Recheck when the bracket, screw, post bore, finish or instructions change.
The review should identify the actual interface and preserve evidence for the approved revision. It does not prove a universal load capacity, wall-anchor suitability or zero-loosening performance. Those require project-specific design and supporting evidence.
Preguntas frecuentes
Does a loose towel-bar post always mean the wall anchor failed?
No. The wall plate can remain fixed while the post-to-bracket connection loosens. Inspect both interfaces and identify where movement begins before changing the anchor or replacement part.
What should the set screw contact?
The approved bracket or post seat shown in that product’s drawing. Different assemblies use different profiles. Do not assume one generic screw position or bracket lip applies to every towel bar.
Can I specify one tightening torque for all posts?
No universal torque is provided here. Use a value only when the design owner or validated assembly instruction specifies it for the actual screw, material and bracket.
What should be included in a replacement kit?
Identify the compatible screw and bracket or post by part number and product revision. Include the correct instruction and tool where required. A screw alone will not correct a deformed or incompatible bracket.
How can buyers check engagement without destructive testing?
Review the disassembled interface, seating stop and screw contact visually; assemble the production-intent sample with the specified tool and instruction; record alignment and movement. Separate this dimensional and serviceability review from any structural performance test.
Developing a Custom Metal Towel Bar?
Send Koitor your bar drawing or sample, concealed bracket profile, set-screw details, finish, packaging needs and order quantity. The factory team can discuss bathroom-hardware structure and practical OEM development options. Final post retention and installation claims should follow the approved product drawing and sample review.
OEM / MARCA BLANCA
Convierte esta guía de abastecimiento en un resumen del producto
Indícanos el producto que deseas, el tamaño, el acabado, la cantidad del pedido y los requisitos de embalaje. Tu equipo recibirá un análisis práctico de la viabilidad de fabricación antes de recibir el presupuesto.
 English
 Español
 Português
 Français
 Deutsch
 العربية