
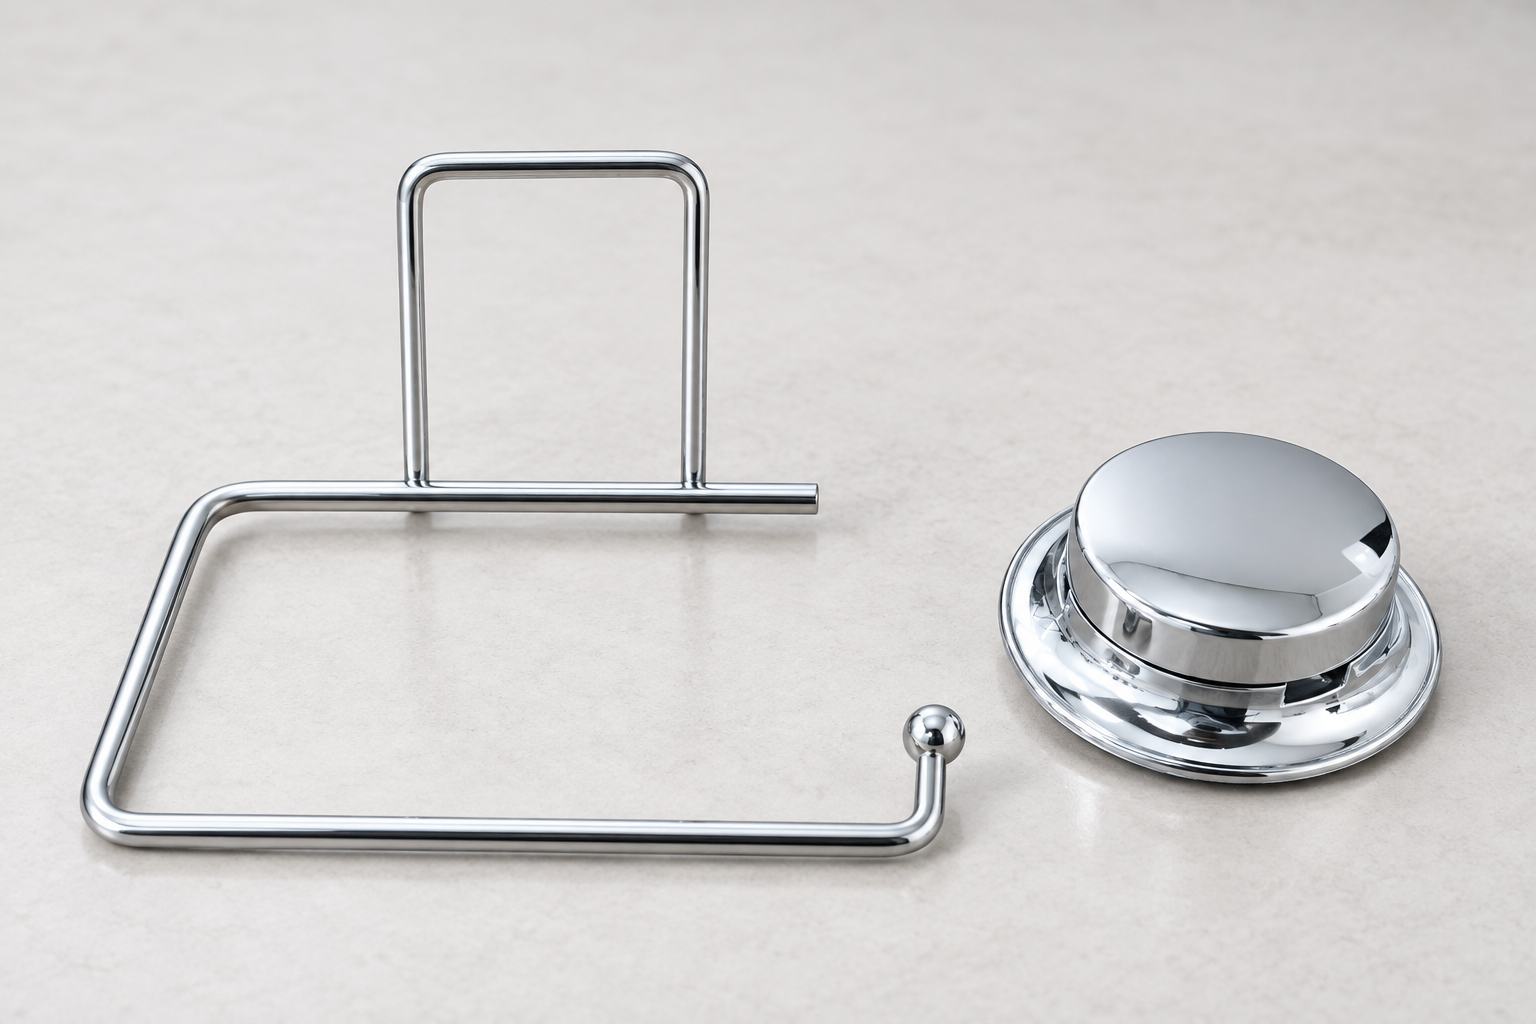
Suction cup hardware mounting interface design should be reviewed as a complete load path between the rubber cup, locating base, metal accessory frame, and front cover. For an OEM buyer, a polished round cover does not explain how the wire holder is retained behind it. The most reliable development brief identifies each mating feature on an approved physical sample, records the assembly order, and checks that a proposed frame change still fits the intended suction unit before tooling or retail claims are approved.
What does the mounting interface include?
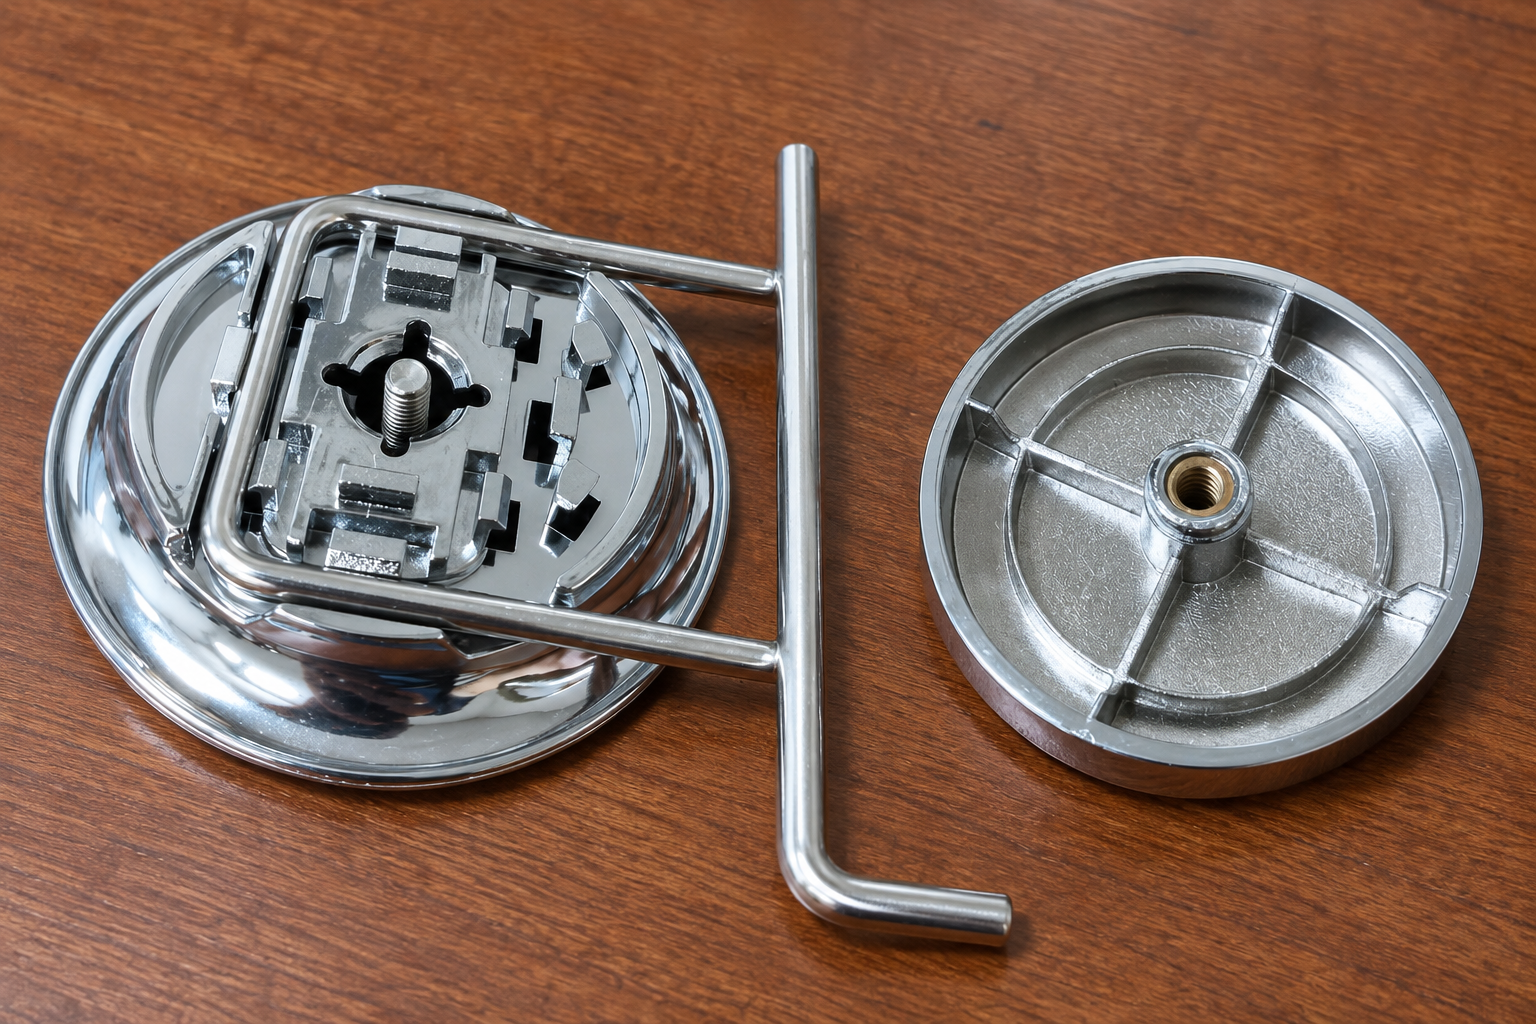
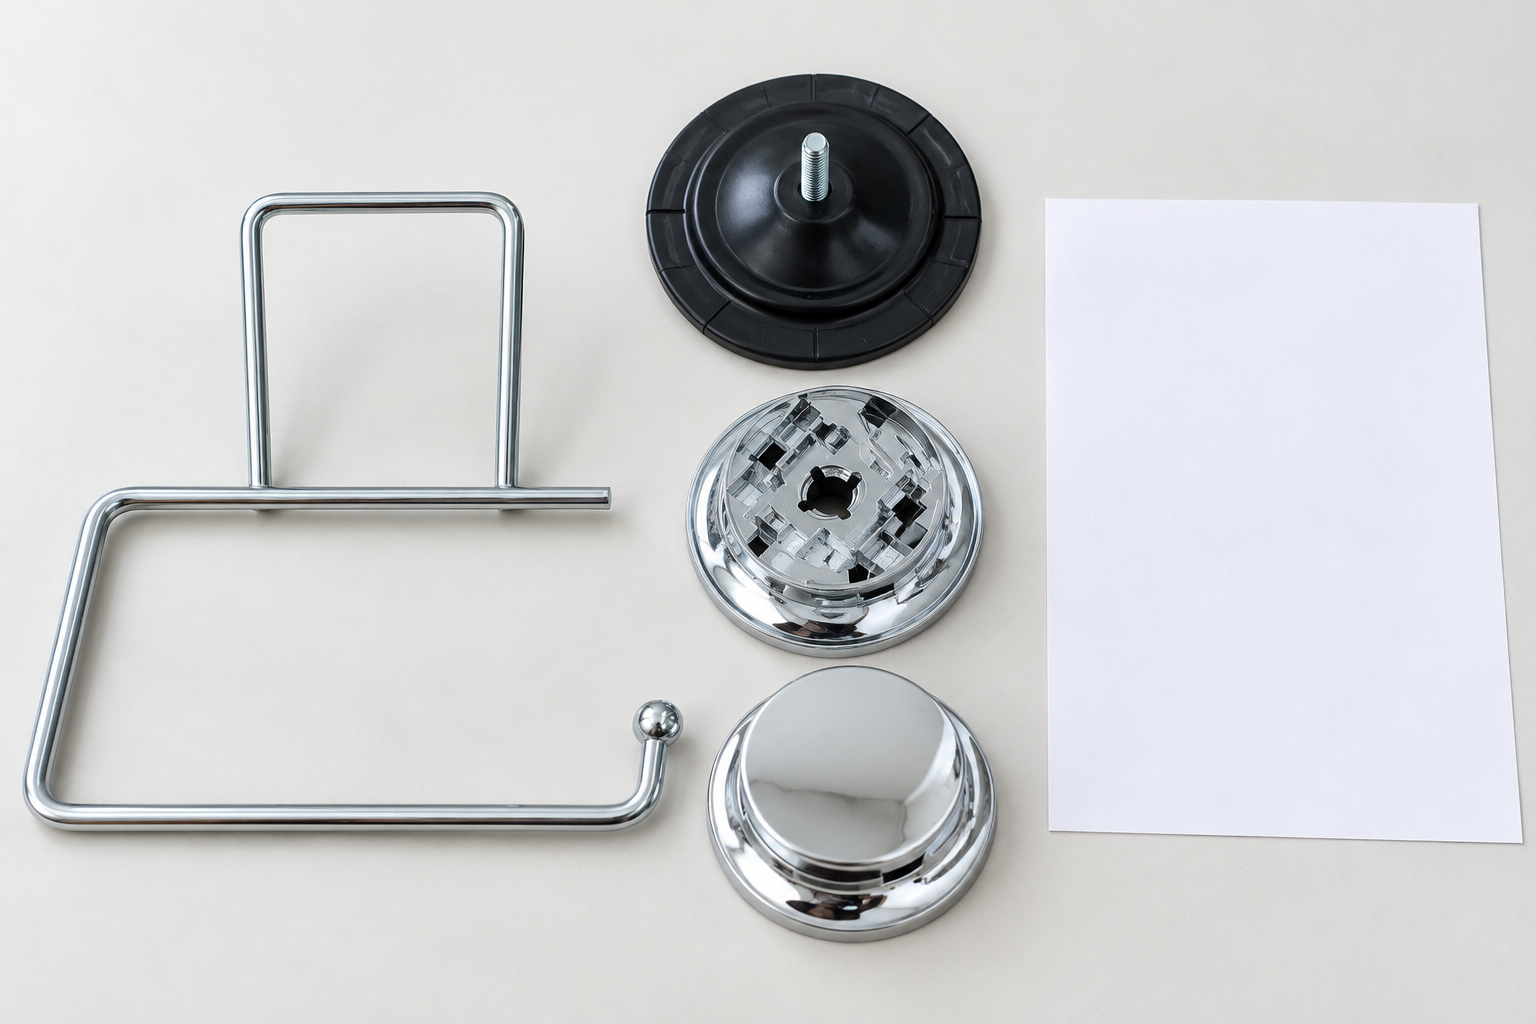
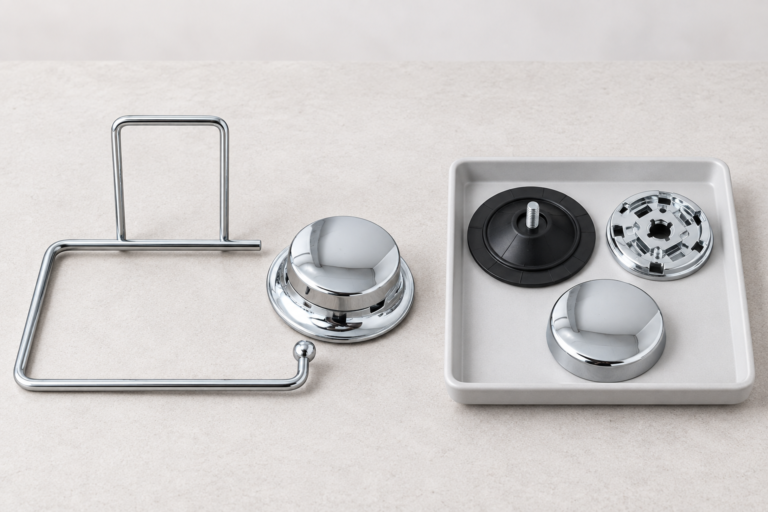
The mounting interface is every physical contact and locating feature that keeps the accessory frame correctly positioned in the suction assembly. It is broader than the visible chrome cover. In the documented Koitor suction toilet-paper holder example, two parallel return wires at the end of the bent frame seat in channels and retaining features on the rear of an electroplated circular base. A black rubber suction cup sits on the wall side. Its central male stud passes through the keyed base opening, and a separate female-threaded front cover clamps the parts together.
That description comes from the product-specific assembly photographs in Koitor’s reference library. It establishes the illustrated holder’s component order and retention method, not the internal construction of every suction basket, hook, towel ring, or bottle holder. When buyers develop another accessory, they should request its own drawing or sample. Similar smooth covers can conceal different wire paths or mounting details.
The buyer needs to know which part locates the frame, which part provides the wall-contact surface, and which connection holds the assembly together. If those roles are not explicit, a prototype can look correct from the front while allowing a wire to shift behind the base. A product drawing should therefore include the rear view and an assembly section, not just a front-facing sales rendering.
Koitor Hardware is a family-owned custom metal hardware factory specializing in bathroom and home storage hardware. Its drawing- or sample-based OEM development can help a buyer review wire bends, retaining positions, finish and packaging as one product. The no-drill bathroom accessories manufacturing page provides context for the wider product family.
How does the documented tissue-holder assembly retain its frame?
The documented holder frame is retained by two parallel wire sections seated against the base’s matching rear features before the suction cup and cover are joined. The wires are not fastened directly to the rubber cup or to the smooth front face. The base positions the frame; the center connection then clamps the rubber cup, base, and captured frame into the intended assembly. This order matters because tightening a cover cannot correct a wire that never entered its locating channels.
- Orient the two parallel return wires toward the rear of the electroplated base.
- Place both wire sections in their corresponding channels and retaining features.
- Check that the frame sits flat and aligned against the base rather than rocking or rotating freely.
- Position the black rubber cup on the wall side and pass its male center stud through the keyed opening.
- Align the female-threaded front cover with the exposed stud and join the assembly.
- Review the finished appearance and the captured-frame position against the approved sample.
This is an observed assembly sequence, not an installation torque specification. The photographs do not establish a number of cover turns, load rating, material grade, or universal tightening direction. The buyer should define any such requirement from a controlled drawing and product-specific validation, not infer it from the shape of a chrome cap.
For design review, look closely at the path of both wires. If only one wire sits in a channel, the frame may appear roughly centered from the front but lacks the intended symmetric retention. If the wire bend changes, it may stop short of a retaining feature or create a gap. A bend tolerance or fixture proposal should be justified by the physical sample and drawing, then confirmed during sample approval.
Which design changes can disturb the interface?
Changes to the metal frame, suction base, rubber cup, or cover can affect the interface even when the product still looks similar in a catalogue image. A revised paper-roll arm may alter the return-wire spacing. A thicker finish or changed bend may prevent a wire from seating. A new base may move a channel or keyed opening. A replacement cup may have a different center connector. A different cover may not engage the intended stud or may interfere with the bracket.
| Proposed change | Interface question | Sample evidence to request |
|---|---|---|
| Frame wire diameter or bend | Do both return wires still seat in the base channels without forced fit? | Rear-view assembly photograph and physical fit sample |
| Base geometry | Are retaining features and keyed center opening unchanged for the specified frame and cup? | Drawing revision and mating-part comparison |
| Rubber cup | Does the wall-contact profile and male center connection match the approved base and cover? | Component sample and assembled review |
| Front cover | Does its female connection clamp the set while preserving the approved visible shape? | Section or inner-view drawing and finished sample |
| Finish or coating | Does the finished part still fit and avoid damage at the contact points? | Production-finish sample, not bare-metal fit alone |
A buyer should separate cosmetic approval from interface approval. Chrome appearance can be acceptable while a hidden mating face is wrong. Conversely, a well-fitting prototype may still need a finish sample before retail presentation is approved. Ask the factory to record the changed part and check the full four-element assembly after each relevant design revision.
Suction cup hardware mounting interface design is especially sensitive when the accessory frame is customized from a buyer’s sample. The factory may be able to bend and weld a visually close frame, but the return-wire geometry at the base must be checked as a functional feature. Provide a sample or dimensions that define that interface, and identify which features may be modified without changing the suction unit.
What should importers inspect in a prototype review?
Inspect the prototype in separated, partly assembled, and finished states. The separated state shows whether the supplied parts are the correct design. The partly assembled state reveals hidden wire seating and stud alignment. The finished state shows whether the cover sits as expected and the frame is correctly oriented. A single hero photograph of an installed holder cannot substitute for these views.
Start with the bill of materials and drawing revisions. Identify the metal frame, base, rubber cup, and cover. Compare each to the approved sample, including the hidden back of the base and inside of the cover where relevant. Then assemble a representative sample using the intended work instruction. Note any force, scraping, wobble, or unexpected gap. The objective is to detect fit and assembly problems before a production batch repeats them.
Inspect the rubber contact face separately. A correct metal interface does not compensate for dirt, cuts, or deformation at the wall-contact edge. Likewise, a clean cup cannot stabilize a frame that is not retained in its base. Keep these observations distinct in the sample report so a defect is not described vaguely as “weak suction” when the real issue is a wire or cover fit.
For the tissue-holder example, test the holder with the paper roll format and clearance specified by the buyer after the interface is assembled. The roll or shelf should not force the frame out of alignment or hide a mounting defect. This is a product fit review, not proof of a universal load capacity. Any holding-performance assessment must be agreed for the finished product and intended mounting conditions.
The importer can request a small evidence pack: front and rear photographs, a short assembly sequence, part revisions, a finished physical sample and a record of any design changes. This makes a later repeat order easier to control. Koitor’s direct factory communication supports such practical sample review, but acceptance criteria still need buyer agreement.
How should interface drawings and change records be organized?
Use one controlled assembly drawing with references to the component drawings and a clear revision history. The drawing should identify the two wire seats, central opening, mating stud and cover connection for the documented holder. It should also show the wall side and room-facing side, so the assembly order cannot be reversed. Photographs can help explain the shape, but the drawing and approved sample should govern repeat production.
When a buyer requests a variation, mark the affected interface features rather than changing only the product name. For example, a new frame shape may retain the same base if its two return wires are unchanged; a new return-wire spacing may require a revised base or retention method. Record the decision in the bill of materials and sample approval. Do not quietly substitute one visually similar base for another during a reorder.
Packaging records should preserve the approved assembled state. If the product ships assembled, the pack must avoid pressure or rubbing that affects the rubber face, cover finish or wire frame. If it ships partly assembled, the buyer needs an instruction and part count that reflect the actual component interfaces. This packaging question follows the interface design; it does not determine the hidden geometry by itself.
Small-batch OEM development is a practical time to settle these records. A short trial can reveal whether an operator can place both wires consistently, whether the cover seats cleanly, and whether the finished frame orientation matches the buyer’s intended roll access. The buyer can approve or revise the assembly before a larger distributor program. No exact cycle-time or defect-rate claim is needed to make that decision.
What belongs on a buyer interface checklist?
The suction cup hardware mounting interface design checklist should make hidden fit review as explicit as visible appearance review. It should name the specific product and revision, and it should ask for evidence that each structural contact works as intended. For a different suction accessory, replace the tissue-holder-specific wire items with that product’s verified attachment geometry rather than copying the checklist mechanically.
- Is the product model and approved drawing revision identified?
- Are the frame’s two return wires the correct shape and spacing for this tissue-holder base?
- Do both wires sit in the intended channels and retaining features without forcing?
- Is the keyed base opening consistent with the specified rubber cup center stud?
- Does the female-threaded front cover match the stud and present the approved smooth exterior?
- Does the assembled frame remain aligned and correctly oriented?
- Are the rubber contact face and chrome surfaces free from sample damage?
- Have product fit, packaging and any required performance methods been reviewed separately?
- Are changes to the frame, base, cup or cover recorded as an approved revision?
Use the checklist when requesting a quotation or approving a revised sample. Send the actual holder or a controlled drawing to Koitor, identify the features that must remain unchanged, and state the intended finish, packaging and order quantity. The Koitor contact page is a direct route for a drawing- or sample-based discussion.
FAQ: What do buyers ask about suction mount interfaces?
Can the metal holder frame be attached directly to the rubber cup?
Not in the documented Koitor tissue-holder assembly. Its two parallel wire ends are captured by the base’s rear retaining features. The cup and front cover then clamp the defined set together.
Can one chrome base be used for several accessories?
Only after the specific frame geometry and mating parts are verified. A similar cover appearance does not prove common hidden retention features or compatible wire spacing.
Does a good front view prove the interface is correct?
No. The rear wire seats, keyed opening and cover connection are largely hidden in a finished view. Review the separated parts and a partly assembled sample.
What numbers should the buyer specify?
Use product-specific drawing dimensions, tolerances and test requirements agreed during development. The reference photographs do not establish a universal torque, load, material grade or installation cycle.
Should a frame redesign trigger a new sample approval?
Yes when it changes the mounting-end geometry or could affect wire seating, alignment or cover clearance. Record the revision and compare it with the controlled assembly sample.
Collaborez avec Koitor Hardware
Review Your Suction Mounting Interface
Send Koitor a drawing or physical sample showing the frame, suction base and cover. The factory can discuss wire geometry, sample fit, finish and practical small-batch OEM production before quotation.
Fabrication pour compte de tiers / Marque de distributeur
Transformez ce guide d'approvisionnement en cahier des charges
Indiquez-nous le produit souhaité, ses dimensions, sa finition, la quantité commandée et vos exigences en matière d'emballage. Votre équipe recevra une analyse pratique de la faisabilité de la fabrication avant l'établissement du devis.
 English
  Español
  Português
  Français
  Deutsch
  العربية