

How to remove a towel rack safely starts with identifying the concealed mount, not pulling the bar away from the wall. A post may be retained by a small set screw, a clip, a wall plate, exposed screws, or another model-specific feature. Find the exact product instructions, support the rack, and release only the feature the maker identifies. If the mounting system is unknown, damaged, or still carrying a load, stop and ask the product maker or installer before applying force.
What Should You Identify Before Loosening a Towel Rack?
First locate the product model and installation instructions. Check the packaging, invoice, order record, instruction sheet, brand name under an end cap, or supplier contact. Towel bars with similar round or square posts can use different set screws, clips, brackets, and wall anchors. A photograph of the front does not establish the mount behind the post.
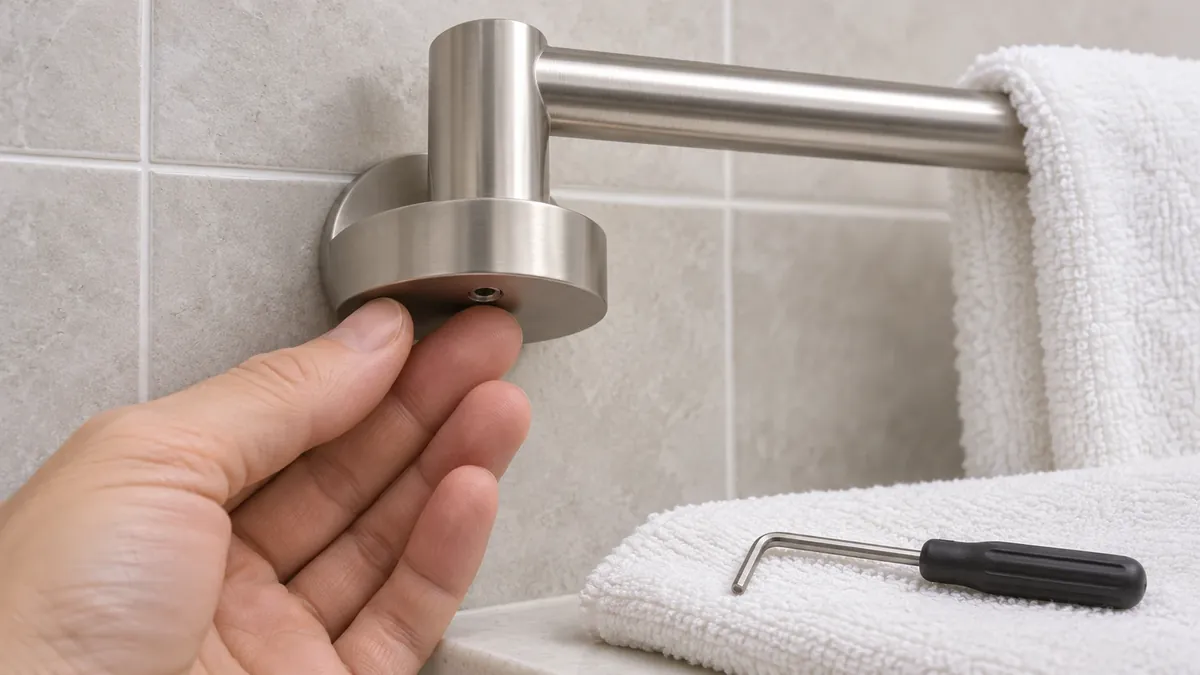
Next inspect the rack without moving it. Look for a small opening under or beside each end post, a seam between the post and wall, an exposed screw, a separate decorative cap, a visible wall plate, or a release tab. These details are clues only. Do not insert a tool into an opening until a product drawing or manual confirms its purpose. A drain hole, molding feature, or cosmetic recess can resemble a fastener access point.
Before removal, record:
- Product model, brand, finish, and installation revision if known.
- Whether the rack is a single bar, a ring, a shelf with rail, or a combined unit.
- The number and location of posts or brackets.
- Any visible set screw, clip, plate, cap, or mounting hole.
- Wall material, nearby grout lines, sealant, and any visible damage.
- Whether the bar is loose, bent, or still supporting towels or other items.
- Previous repair attempts, replacement parts, or installation changes.
Remove items from the rack as directed by the product maker and keep the work area clear. If the rack is in a public restroom, hotel, rental property, or shared facility, confirm that you are authorized to remove it. A maintenance worker may need to preserve the original hardware, anchor locations, or product record for warranty or property-management purposes.
How Do Different Concealed Mounts Change the Next Step?
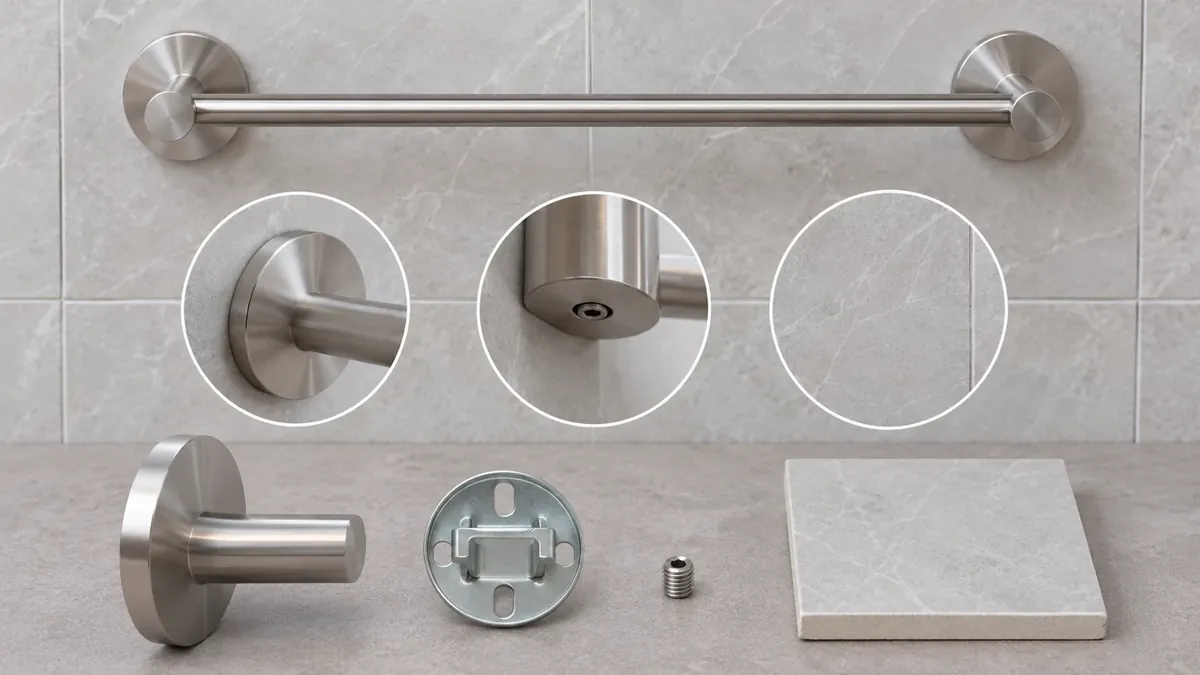
The end post is usually the visible part of a larger assembly. Some designs use a set screw to retain the post on a wall-mounted plate; another design may use a clip, a spring feature, concealed fasteners, or a separate bracket. Exposed-screw versions have different access requirements. Identify the mechanism from the model instructions before selecting a tool or direction.
| Visible feature | Possible mount family | What to confirm before action |
|---|---|---|
| Small threaded opening under the post | Set-screw retention | Confirm the exact screw location, tool, and whether loosening releases the post from a plate. |
| Seam or slot near the post edge | Clip or spring retention | Find the maker’s diagram; do not pry into the seam by guesswork. |
| Decorative cover over a base | Concealed screw or wall plate | Verify how the cover is designed to release and support the part. |
| Visible screw heads | Direct or bracket attachment | Identify the fastener sequence and whether the rack must be supported during removal. |
| No visible fastener and no manual | Unknown concealed system | Stop and request the model information or professional assessment. |
Manufacturer documents illustrate model-specific differences. Moen’s Vitric towel-bar technical specification describes a sequence involving a mounting plate, posts, and set screws for that product family. Delta’s product support information for a Dryden towel ring identifies a set screw at the bottom of the connection for that model. Neither document proves that another rack uses the same screw size, plate, orientation, or release method.
This difference matters for aftersales guidance. A service reply that says “look underneath and loosen the screw” may be wrong for a clip-retained post or a model with a different fastener. The manufacturer may also revise components while retaining a familiar product name. Match the manual to the product number and revision where possible, and ask the supplier when the visible feature does not match its diagram.
How Should a Confirmed Set-Screw Mount Be Released?
Follow the exact manufacturer’s sequence and use only the stated tool and access point. Support the bar and end posts so they do not drop when a post disengages. A set screw may hold a post to a separate mounting plate, but the fastener’s location and release direction vary. Do not choose a hex-key size based on a nearby product or a general internet answer.
Some product instructions show the post separated from the wall plate before the plate itself is removed. Others may assemble the bar and posts together. The manual decides the sequence. If a screw does not turn with the specified tool, stop instead of applying greater force; the screw may be corroded, damaged, covered, or a different type. A rounded fastener can make later service more difficult and can damage the finished post.
Keep small screws and caps in a labeled container. Photograph each side before removal and record which post or bracket each part came from. If the rack has two mounting points, compare the design rather than assuming both are identical. Some assemblies can have a directional post or a different fastener on each end.
Do not use a power driver unless the manufacturer’s instructions permit it. Do not heat, drill, cut, hammer, or pry the end post from the wall as a shortcut. These operations can damage the finish, wall tile, drywall, anchors, concealed wiring, water-control layers, or the rack itself. If the mounting plate remains attached after the post is removed, consult the same product instructions for the wall-fastener stage.
What if the Post Uses a Clip or the Mount Is Unknown?
Do not assume that a hidden clip releases by pulling in a particular direction. A clip can be fragile or concealed behind a decorative cover, and the visible seam may not be an access point. Find the product diagram or ask the installer or supplier to identify the post retention feature. If there is no reliable identification, avoid prying or twisting.
For an unidentified mount, take clear photographs of the complete rack, both post-to-wall interfaces, any underside opening, and the surrounding wall. Include a ruler only as a scale reference, not as proof of exact dimensions. Record the product’s location and history and send the information to the brand or property maintenance team. A model lookup may reveal a product-specific release tool or a replacement cap that is not visible from the front.
If the rack is loose, cracked, bent, or pulling away from the wall, keep people from loading or leaning on it. A loose product can still be attached at one end. Support it and follow the responsible maintenance authority’s safety procedure. Do not tug to test whether it will come free. If water, electrical service, or hidden building services may be near the location, use a qualified installer to inspect before drilling or removing anchors.
How Can You Protect the Wall and Finish During Removal?
Protect both the wall and the finished hardware. Keep the bar supported, avoid metal tools against visible faces, and use a clean, padded surface to set removed components down. The product manual may specify finish care, but that does not necessarily cover removal tools or wall repair. A tool can scratch a plated or coated post even when the fastener action is correct.
Before removing a wall plate or exposed screw, identify the wall surface and anchor type if the instructions provide it. Ceramic tile, glass, stone, drywall, wood, and masonry require different handling. Do not pry a plate off a tile face, drill into an unknown wall, or lever against a grout line. If the fastener or anchor is seized, stop and ask an installer rather than enlarging the hole or chipping the surface.
After the rack is removed, inspect the wall for cracks, loose tile, pulled paint, damaged sealant, stripped anchor holes, or a changed opening. Do not describe the wall as undamaged because the rack came away. Photograph the result and compare it with the pre-removal condition if a record exists. The property owner or installer should decide whether the location is suitable for a replacement product and whether the surface needs repair.
Keep removed hardware grouped by product and location. Do not mix posts, mounting plates, anchors, and screws from separate rooms or units. If parts are returned to a supplier, the identity and orientation help with inspection. If the rack will be reinstalled, confirm that the original mounting components are reusable under the product instructions; a screw or anchor that has been damaged should not be returned to service by assumption.
What Should a Property Team Record After the Rack Is Removed?
Create a short maintenance record that connects the removed hardware to its location and next disposition. This is useful in hotels, apartments, commercial washrooms, and distributor service programs where multiple similar products may be installed. It also prevents a later installer from trying to identify an unknown mount after the packaging has been discarded.
| Record field | What to capture | Follow-up decision |
|---|---|---|
| Product | Brand, model, finish, and room or asset location | Source the correct replacement part. |
| Mount | Set screw, clip, exposed fastener, or unknown | Retain a model-specific instruction. |
| Wall | Material, visible condition, and existing holes | Decide whether repair or a different mounting layout is needed. |
| Hardware condition | Bent bar, damaged finish, missing screw, or intact parts | Return, replace, or dispose under the owner’s policy. |
| Removal method | Instruction revision and tool used | Keep future maintenance consistent. |
| Disposition | Reinstall, replace, inspect, or hold | Assign the responsible person and date. |
When a failure is involved, retain the original parts until the manufacturer or warranty owner decides whether they need inspection. Do not clean away a residue, file a contact mark, or replace a fastener before documenting the condition if that information could explain the issue. A maintenance record should distinguish observations from conclusions: “post moved while unloaded” is an observation; “anchor failed due to bad installation” is a conclusion that needs evidence.
For distributors, a complete service request can include the product number, purchase channel, shipment or lot reference, installation surface, photographs, and what was already attempted. This helps the supplier identify the product and avoid sending generic instructions that fit another model. If the part’s product identity is unknown, state that uncertainty instead of guessing based on finish or silhouette.
Separate a product defect from a building-interface issue. A stripped set screw, missing clip, loose wall anchor, cracked post, or damaged finish should be recorded as observed before assigning cause. The wall may have been repaired since installation, the replacement fastener may differ from the original, or the part may have been assembled with a previous revision. These possibilities are not conclusions; they are reasons to preserve the hardware and installation history. Ask who installed it, whether the wall was drilled or patched, and whether a replacement component was used.
If the rack is part of a multi-room rollout, record the locations and product revisions for similar units. A repeated issue can help the buyer decide whether to inspect the same model elsewhere, but the distribution of complaints alone does not prove a design or supplier defect. Keep the affected parts labeled by room and lot, and compare the actual mounting features against the approved drawing. Avoid mixing parts before a supplier or property engineer has reviewed them.
Before selecting a replacement, verify the new rack’s center-to-center spacing and mounting footprint against the existing holes. A product that looks similar may use a different post diameter, plate spacing, or screw layout. Do not elongate a wall opening or cover it with a decorative post without the installer’s review. If a different model is chosen, the buyer should confirm that the old mounting location can support the new interface and that any unused holes can be repaired without compromising the wall surface.
How Can OEM Buyers Make Towel-Rack Service Easier?
Serviceability is a product-development decision. Buyers can ask early how the end posts attach, whether fasteners remain accessible after installation, which tool is required, how replacement parts are identified, and whether the design can be removed without prying against a finished wall. These questions do not dictate one universal mounting system; they clarify the maintenance path for the selected design.
Add service requirements to the RFQ or drawing package:
- Mount type and retaining feature for each post.
- Access location and approved tool for any fastener.
- Installation and removal sequence for the exact model.
- Replacement fastener, cap, bracket, or post part number.
- Permitted wall surfaces and installer responsibility.
- Finish protection and packaged spare-part handling.
- Required maintenance photos or traceability fields.
For product development, review the service path with a representative wall sample, not only with the loose accessory on a table. Check that the installer can access the stated fastener after the bar is positioned, that the cap or post does not hide a required identification mark, and that the assembly sequence can be shown clearly in the instruction. If the end post is designed to slide over a wall plate, confirm the post clearance and retention feature in the drawing and sample. If the sample uses a different screw or bracket from production, the removal review is not representative.
Buyers can also decide whether a small spare-part kit should be packed or made available for aftersales. The kit may need a model reference, an approved fastener, a replacement cap, or a service instruction, depending on the actual design. Do not include a generic hex key or anchor just to appear helpful; it must match the shipped product and intended wall construction. Clear part identification reduces the chance that a maintenance worker substitutes a fastener based on visual similarity.
The question how to remove a towel rack is therefore partly a documentation and sourcing question: can the buyer identify the post, bracket, fastener, and wall interface years after the original packaging is gone? Record those relationships in the product file and retain a link to the correct instruction revision.
A factory can help review drawings and samples to identify an access conflict, a hidden fastener, or a component that may be difficult to assemble. Koitor Hardware is a family-owned custom metal hardware factory focused on bathroom and home-storage products. Its approved scope supports OEM customization from buyer drawings or samples, metal forming and fabrication, finishing requirements, assembly, and packaging preparation. It does not mean every concealed mount, anchor, or fastener is made in-house or that Koitor can determine the condition of a specific installed wall.
For a custom project, share the drawing revision, post and plate details, target wall interface, quantity, finish, and service requirement. The supplier can help clarify what belongs on the fabricated-part drawing and what must come from the bought-in mounting component or installer. A prototype or sample can help review access and assembly before a production order, but the approved sample should match the final fastener, wall plate, and finish revision.
Review the Umfang der OEM-Fertigung von Hardware für die Heimdatenspeicherung and contact Koitor with the drawing or sample through the project contact page. For an installed consumer product, follow that product maker’s instructions and use a qualified installer when the mount or wall condition is uncertain.
Häufig gestellte Fragen
How to remove a towel rack with no visible screw?
Do not pull or pry it off. Identify the brand and model, inspect the manual for a concealed clip or separate wall plate, and ask the supplier if the feature is not clear. A seam alone does not identify the release method.
Are towel-bar set screws always underneath the post?
No. Their location and type vary by model, and some products use clips or another mounting design. Use the model-specific instruction sheet and do not use a tool based on a general example.
Can I use pliers if a post is stuck?
Do not use pliers on a finished post unless the maker specifically directs it. They can damage the finish, round a fastener, or transmit force to the wall. Stop and ask the product maker or installer.
Should I remove the wall plate after the post comes off?
Only if the product instructions call for it and the wall fasteners are understood. The post and wall plate may be separate components with different removal steps. Support the part and avoid prying against tile or grout.
What should I do if the towel rack is loose?
Do not load it or tug it to see whether it will detach. Keep people clear, support the assembly if appropriate, and contact the property maintenance team or product maker. A loose rack may still be retained at one end.
Can the same towel bar be reinstalled in the original holes?
That depends on the wall condition, anchors, hardware, and product instructions. Have the installer inspect the wall and confirm the correct fasteners before reuse. Do not assume a removed anchor remains suitable.
How do I know whether the wall was damaged?
Inspect the tile, grout, paint, sealant, mounting holes, and surrounding area under suitable light. Compare with the pre-removal condition if available and document any change. The property owner or installer should decide whether repair is needed.
What if the product manual is unavailable?
Search using the product model, contact the manufacturer or retailer, or ask the installer. Send photographs of both posts and the wall interface. Do not substitute instructions for a similar-looking model. If the model remains unknown, provide photos of both posts, any underside opening, the full bar, and the wall interface. State whether the product is loose or damaged and what has already been attempted. Mark the mount as unknown until the supplier confirms it; do not let a work order prescribe a set-screw method based on a similar-looking product. For a property portfolio, store the supplier’s identification with the asset record so the next maintenance team does not repeat the same guesswork.
Arbeiten Sie mit Koitor Hardware zusammen
Share the product drawing or sample, concealed-mount details, target wall interface, and required service access. Koitor can clarify the OEM hardware scope; removal of an installed product should follow its exact manufacturer instructions.
Specify the Mount and Service Access Together
Send the drawing or sample and describe the installation and removal requirements for your assortment.
OEM / EIGENE MARKE
Verwandeln Sie diesen Beschaffungsleitfaden in ein Produktdossier
Teilen Sie uns Ihr Zielprodukt, die Größe, die Oberflächenausführung, die Bestellmenge und Ihre Verpackungsanforderungen mit. Ihr Team erhält vor der Angebotserstellung eine praxisorientierte Prüfung der Herstellbarkeit.


 English
 Español
 Português
 Français
 Deutsch
 العربية