
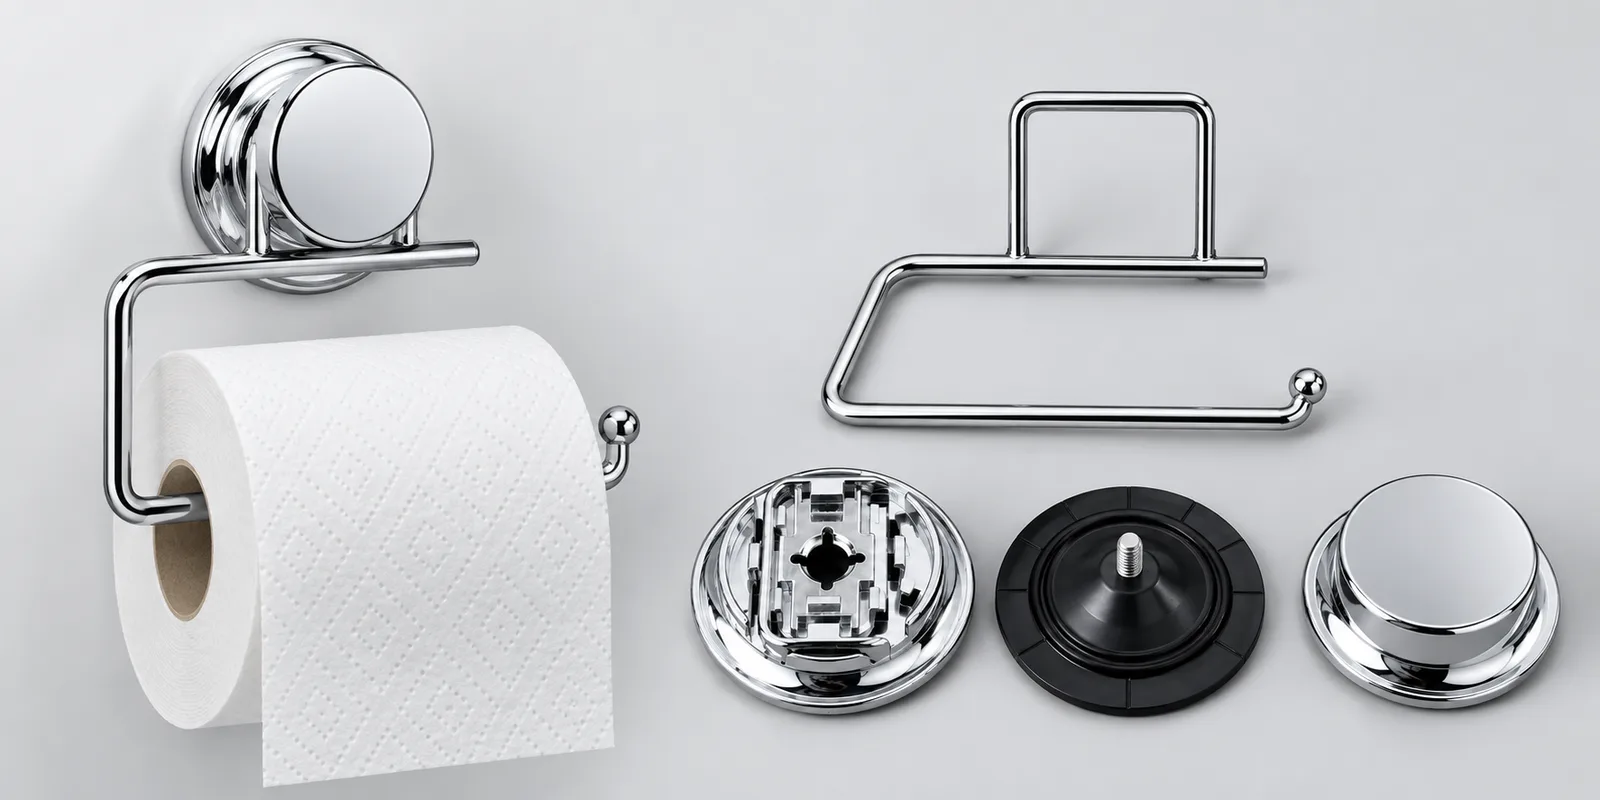
Suction cup bathroom accessory assembly inspection should check the complete mounting assembly, not only the finished chrome appearance. For a buyer, the useful sequence is to identify the approved components, inspect hidden mating features while the product is partly assembled, confirm the finished frame position, and record any difference from the approved sample. A suction mount can look presentable from the front while a wire, cup or cover is incorrectly seated behind it. Treat assembly fit, wall contact, product function and packaging as separate acceptance decisions.
What does assembly inspection cover for a suction bathroom accessory?
Assembly inspection checks whether the correct parts have been joined in the intended order and whether each connection is visibly and physically seated. It does not, by itself, establish a holding force, service life or compatibility with every bathroom wall. Those performance questions require a product-specific method agreed by the buyer and manufacturer.
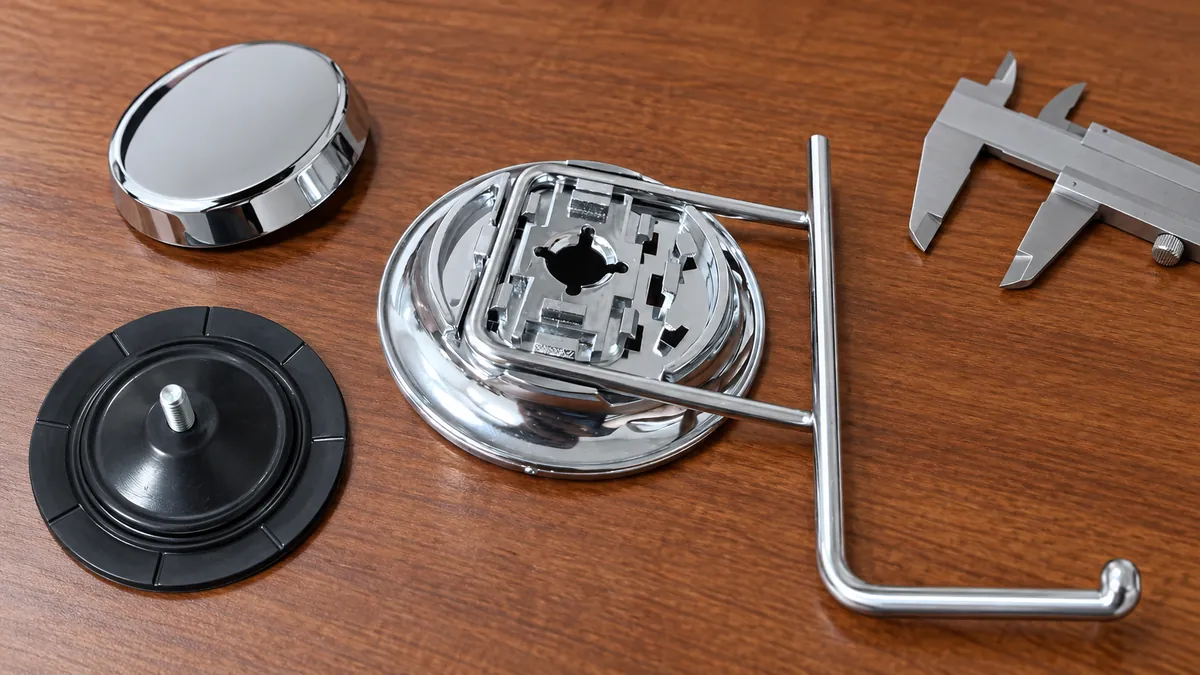
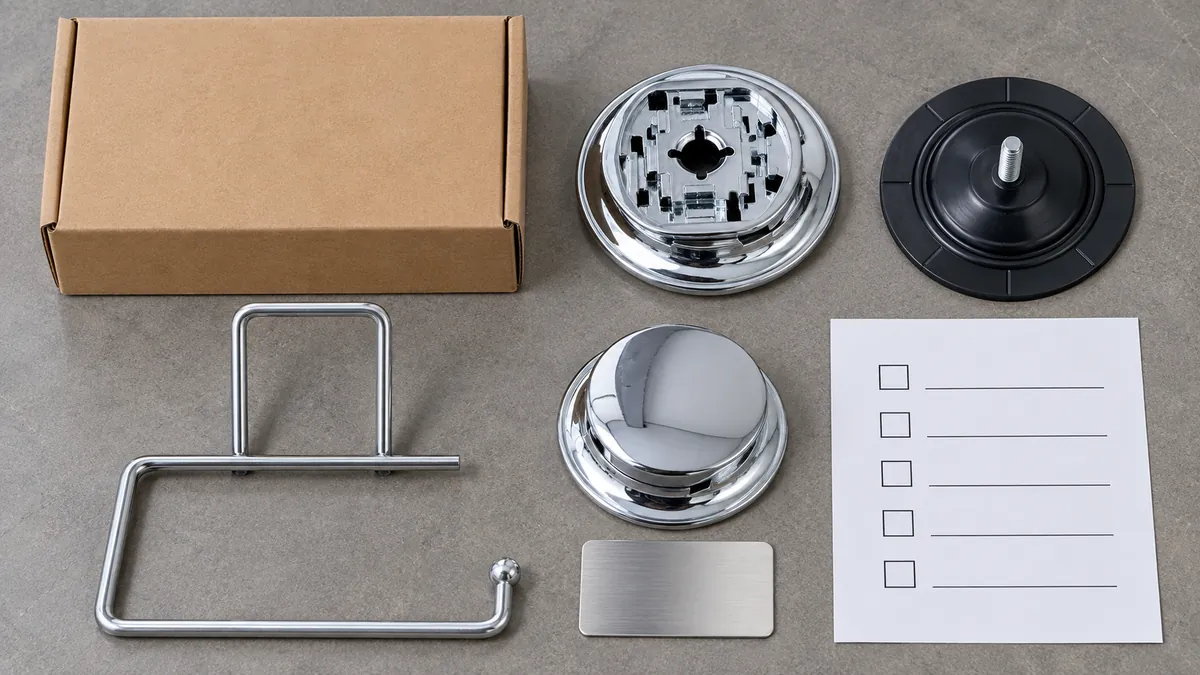
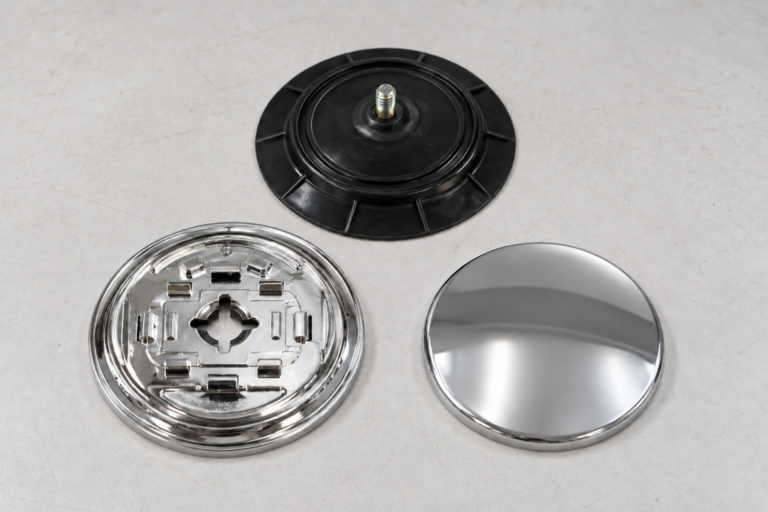
For the suction toilet-paper holder documented in Koitor Hardware’s product reference photographs, the parts are a bent metal holder frame, an electroplated circular base, a black rubber suction cup and a separate smooth front cover. Two parallel return wires on the holder frame locate in channels and retaining features on the rear of the base. The cup’s center male stud passes through a keyed opening; the female-threaded cover joins from the room-facing side and clamps the set. These details describe this documented holder, not every suction hook, shower caddy or basket.
An importer should therefore begin with a part list and an approved sample or controlled drawing. A part list identifies which frame, base, cup and cover belong to one product revision. A controlled drawing is a versioned record of geometry and assembly relationships. Without both, a factory can receive a visually similar replacement component that does not mate correctly with the remaining parts.
The inspection should have three viewing points: components before assembly, the partly assembled mount before the cover hides it, and the final product. In the first view, check component identity and damage. In the second, check wire seating, the central opening and connection alignment. In the third, check frame orientation, cover seating, surface condition and product fit. Photographs of these states make later supplier discussions specific.
Koitor Hardware is a family-owned custom metal hardware factory that develops bathroom and home storage hardware from buyer drawings or physical samples. Its custom bathroom hardware manufacturing work can include a practical review of metal structure, finish, assembly and packaging before a sample is approved. The buyer should still specify the exact acceptance criteria for the chosen product.
Which parts should be checked before assembly begins?
Check every mating part against the approved bill of materials and physical reference before assembling a sample. A correct-looking chrome cap does not prove that its inner connection matches the specified cup stud, and a frame that resembles the approved product may have a different return-wire spacing.
First identify the metal frame. For a wire holder, review the shape of both mounting-end wires, their spacing, the bend transitions and visible finish. Compare the mounting end with the base’s rear channels, not merely with the front product silhouette. A bend or coating change can affect seating even when the paper-roll arm looks unchanged. Do not force the frame into a base to make a sample appear assembled; a forced fit may conceal a mismatched component.
Next inspect the electroplated base. Its retaining channels and blocks must correspond to the frame shown in the controlled sample. The central opening must match the specified cup connector. Check for damage, obstruction, deformation or finish buildup at functional contact areas. An appearance blemish and a locating defect should be recorded separately because they have different causes and remedies.
Inspect the rubber cup as its own component. The wall-contact face should be clean and free from cuts or obvious deformation in the sample under review. Check that its central stud is the specified form for the base and cover. The photograph library confirms a male threaded stud for the documented holder; it does not prove a particular rubber grade or universal wall suitability. Keep material and surface-performance requirements in the buyer specification if they matter to the retail program.
Finally, examine the inside of the front cover. The documented smooth electroplated cover has a female-threaded connection. Compare that connection and the visible outer profile with the approved sample. A cover should not be accepted only because it is shiny and round. Its internal fit, finished seating and interaction with the captured frame must all be reviewed.
For a private-label range, request a revision identifier on the sample record. This helps prevent a replacement cup or cover intended for another suction accessory from entering the wrong assembly during a repeat order. The identifier can be on a drawing or inspection record; there is no need to print it on the visible retail product unless the buyer requires that.
How should inspectors verify wire seating and cover engagement?
Verify the hidden wire seating before the front cover is attached, then verify cover engagement after the cup stud passes through the base. This sequence exposes the two most easily hidden fit problems in the documented tissue-holder mount.
For that holder, place both parallel return wires into their intended base channels and retaining features. The frame should sit in the approved orientation without one wire riding above a retaining block. Look from the rear and from a low side angle. The wires should be compared with the reference sample, including how close the bends sit to the base. If the wires shift freely or the frame rocks unexpectedly, record the observation rather than assuming the cover will correct it.
The black cup then sits on the wall side of the base. Its male stud passes through the keyed center opening. The front cover joins from the other side. Inspectors should check that the cover starts cleanly and reaches the approved seated appearance without scraping, cross-threading or an unexplained gap. The reference photographs establish the part relationship but provide no torque value or number of turns, so a production instruction must define any numeric requirement separately when needed.
After joining the assembly, compare the frame’s position with the approved sample. Does the roll-support arm point the intended way? Does the frame remain centered and stable relative to the base? Is the front cover visually seated without concealing a skewed frame? If a sample needs unusual force or repeated adjustment, treat that as a process observation, even when the final photograph looks acceptable.
Inspectors can use a simple check sheet with the product model, drawing revision, component revision, date and sample identification. The sheet should record observations and evidence rather than a generic “pass” without explanation. For example, “both wires seated in their channels before cover fitting” is more useful than “assembly good.” A photograph of the uncovered base makes that statement auditable by an overseas buyer.
What is the difference between assembly, appearance and performance checks?
Assembly, appearance and performance checks answer different buyer questions. Keeping them separate prevents a polished sample from being mistaken for evidence of long-term holding performance, and prevents a functional mount from hiding a retail-facing finish defect.
| Review area | Buyer question | Suitable sample evidence | What it does not prove |
|---|---|---|---|
| Component identity | Are the specified frame, base, cup and cover present? | Part list, revisions and separated-parts photograph | Correct final seating |
| Assembly fit | Do wires, keyed opening, stud and cover mate as approved? | Rear and partly assembled views, fit notes | Holding life on every wall |
| Appearance | Are visible metal and rubber surfaces suitable for the agreed sample? | Finished sample and surface photographs | Hidden wire retention |
| Product fit | Does the assembled holder accept the buyer’s intended roll or accessory? | Specified product-use sample | A universal load rating |
| Mounting performance | Does the finished unit meet the buyer’s agreed use conditions? | Product-specific test plan and recorded results | Unspecified wall compatibility |
| Packaging | Are parts protected and correctly counted for delivery? | Pack sample, part count and opening review | Correct hidden assembly before packing |
For suction bathroom hardware, the mounting surface matters. A smooth, clean surface can behave differently from a textured or porous one, but this article does not assign performance values to either. Ask the supplier to document the intended surface conditions in the installation instructions and agree a validation method for the exact product. The inspection table above helps keep a visual assembly check from becoming an unsupported retail claim.
A buyer can also distinguish an incoming-component check from an in-process assembly check. Incoming inspection examines the supplied cup, frame and cover before they are joined. In-process inspection checks whether operators seated the wires and connected the parts correctly. A final inspection examines the finished appearance and function. If a problem appears after packing, these records help identify where it arose.
Sampling should cover a representative product revision and the actual finish intended for sale. A bare-metal trial can reveal geometry, but finish thickness and surface handling can change fit or visual quality. If the finish or component supplier changes after approval, request a new comparison for the affected interface. This is a change-control decision, not an assumption that every small variation needs an entirely new product design.
Which assembly mistakes are most likely to escape a front-view photo?
Hidden seating mistakes, mismatched components and incomplete change records can all escape a front-view photo. The final chrome cover conceals much of the interface, so buyers should request evidence from the stage before it is fitted.
One common mistake is seating only one of the two return wires in the documented holder’s channels. The frame may look approximately centered once the cover is on, while one side lacks its intended retention. Another is fitting a frame from a similar product variant into a base whose rear channel positions differ. The parts may be close enough to assemble under pressure but not match the approved sample. A third is using a cover that looks identical externally but has a different inner connection or depth.
Inspect the cup and cover pairing as a set. The documented cup has a male center stud and the cover has a female threaded insert. A cross-threaded or incorrectly seated cover can leave a gap or mark the finish. Do not invent a torque or claim that hand feel alone proves correct engagement. If an objective torque or rotation requirement is needed, derive it from a product-specific approved work instruction and test it for that assembly.
Another mistake is describing every return as “weak suction.” A complaint may originate in wall-contact conditions, a damaged rubber face, a frame that moves in the base, or a cover that has not clamped the set as intended. Separate the observed symptom from its suspected cause. Ask for photographs of the wall side, the hidden base and the finished product when investigating a field issue. This prevents an assembly problem from being mislabeled as a rubber-material problem.
Packaging can hide or create damage after assembly. If the holder ships assembled, check whether the cup face, cover and wire arm contact the carton or insert under the agreed pack arrangement. If it ships partly assembled, the part count and installation instructions must match the actual component sequence. A missing cover or unclear instruction can lead to an apparent product failure even when the manufactured parts are correct.
These checks are especially important for a range with several no-drill bathroom accessories. A suction tissue holder, towel ring and shower basket may share a retail style while using different frame geometries. Koitor’s no-drill bathroom accessories page gives context for the product family; each product still needs its own approved assembly reference.
What should a buyer put in an OEM assembly-inspection brief?
An OEM inspection brief should identify the exact product revision, show hidden assembly interfaces and state what evidence the buyer expects before bulk production. It should also distinguish a sample-approval decision from a general performance claim.
Begin with the product name and the intended use. Supply a controlled drawing or physical sample, then identify the parts that must match it: frame, base, cup and cover. Mark the mounting-end wire geometry and the mating features on the base as critical review points for the documented tissue-holder style. Include front, rear and side views where possible. If an existing part is to be reused, state its revision and identify any geometry that must remain unchanged.
Specify the visible finish and acceptable sample appearance separately from the hidden fit. State the intended retail pack, whether the unit ships assembled, expected part count and any instruction-sheet requirement. If the buyer plans multiple variants, record which parts are shared only after their compatibility has been verified. A family resemblance in catalogue photographs is not enough evidence of interchangeability.
Request a sample review pack: component photographs, a partly assembled rear view, a finished view, identified drawing revisions, fit observations and the packaging sample. A short video of the assembly sequence can help when available, but it should complement a physical sample and written criteria. The buyer should be able to point to a specific failed fit or finish issue without interpreting a single beauty shot.
Koitor Hardware can discuss drawing- or sample-based development, metal bending, surface finish, basic assembly and packaging preparation for a small-batch OEM program. A written suction cup bathroom accessory assembly inspection plan makes those discussions easier to turn into sample criteria. MOQ can start from 100 pieces depending on structure, material, finish and packaging; it is a project discussion rather than a universal offer. Samples usually take 5–7 working days after details are confirmed, and bulk production often takes 4–6 weeks depending on quantity and complexity. Confirm the applicable schedule for the selected design before setting a retail launch date.
Keep the approved sample available for repeat orders. If a frame bend, base, cup or cover changes, note the revision and repeat the relevant fit checks. This protects the buyer from silent substitutions and gives the manufacturer a clear target. Direct factory communication can make that review faster, but both sides need the same written description of what was approved.
What belongs on a suction accessory buyer checklist?
Use the checklist below to approve a specific suction bathroom accessory sample and to prepare a clear quotation request. Replace tissue-holder-specific wire items when the selected product uses a different verified attachment structure.
- Identify the exact product, drawing revision and approved physical sample.
- List the frame, base, rubber cup and cover as separate components.
- For the documented holder, verify that both parallel frame wires enter the intended base channels and retaining features.
- Check the keyed base opening against the selected cup’s center stud.
- Check the front cover’s inner connection and final seated appearance without forcing the fit.
- Record the assembled frame orientation and product-use clearance.
- Review the rubber wall-contact face for visible sample damage.
- Review the metal finish and any contact-point scuffing after assembly.
- Define the intended mounting surface and any product-specific performance method separately.
- Confirm whether the product ships assembled or as separate parts, and review pack protection and instructions.
- Record revisions, sample photographs, observations and approval decisions for repeat orders.
Send the brief and available sample to Koitor through the Koitor contact page. Ask for a discussion of manufacturability, sample scope, quantity and pack format before treating a quotation as a complete product approval. Suction cup bathroom accessory assembly inspection is most useful when it is planned before production rather than added after a fit complaint.
FAQ: What do buyers ask about suction accessory assembly inspection?
Does a finished chrome cover prove the frame is retained correctly?
No. The cover hides the base’s rear retaining features. Inspect the frame and base while partly assembled, and keep a rear-view photograph with the approved sample record.
Can the same inspection sheet cover every suction product?
Use a common structure for component identity, fit, appearance and packaging, but write product-specific checks for each attachment geometry. The two-wire tissue-holder detail should not be copied to a hook or basket without a matching design.
Should a buyer set a standard tightening torque from the reference photos?
No. The photos show component order and connection type, not a torque value. Establish any numeric assembly requirement through the chosen product’s drawing, work instruction and validation.
Is a clean rubber cup enough to approve mounting performance?
No. A clean cup is one component observation. Review the complete assembly, intended wall surface, installation instructions and product-specific performance method separately.
What should happen when a frame or cover is changed after sample approval?
Record the revision and recheck the affected mating features on a new sample. A visually similar part can change wire seating, cover fit or finished frame alignment.
Review a Suction Accessory Sample With Koitor
Send a drawing or physical sample showing the frame, suction mount and pack concept. Koitor can discuss component fit, assembly review and practical small-batch OEM options before quotation.
OEM / PRIVATE LABEL
Turn this sourcing guide into a product brief
Share your target product, size, finish, order quantity and packaging requirements. Your team receives a practical manufacturability review before quotation.
 English
  Español
  Português
  Français
  Deutsch
  العربية