

Cabinet knobs vs pulls is a product-development decision about grip, fixing points, hole reuse, and the motion of the cabinet front. A knob usually attaches at one point while a pull commonly spans two or more fixing points, but the exact form and mounting details vary. Buyers should compare representative hardware on the intended door or drawer, check hand clearance and operation, and approve the drilling layout before releasing a product or packaging specification.
What Is the Practical Difference Between a Cabinet Knob and a Pull?
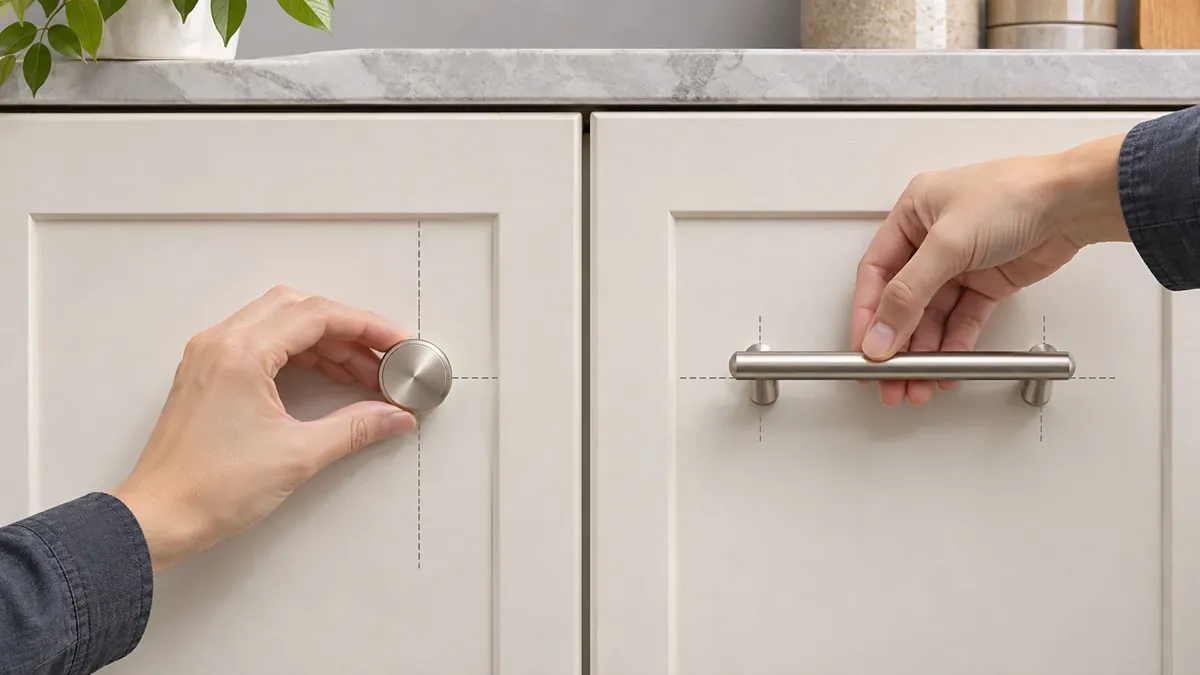
When a buyer asks cabinet knobs vs pulls for a new assortment, the comparison should include a mounted sample and the actual front geometry. A cabinet knob generally presents a single grip point and uses one fixing location. A cabinet pull provides an extended grip and may use two or more fixing points, depending on its design. These are useful starting descriptions, not rules for every product: some pulls use a single mounting point, and decorative forms can blur the visual distinction. Confirm the actual drawing and installation hardware.
The mounting choice affects more than appearance. A single-hole knob may simplify a new cabinet-front layout but still needs a defined position, projection, fastener, and hand-clearance review. A two-point pull requires a center-to-center fixing dimension and consistent hole placement, but that layout may correspond to existing holes on a replacement door. A product program should evaluate the whole interface rather than selecting by silhouette alone.
| Buyer decision | Knob review | Pull review |
|---|---|---|
| Fixing layout | Confirm the single fixing point and fastener | Confirm number of points and center-to-center spacing where applicable |
| Grip | Trial the available grasp and clearance | Check grasp length, finger clearance, and end shape |
| Existing holes | Check whether the intended front has a usable hole or needs a new one | Compare the pull spacing with existing holes or the approved drill template |
| Cabinet motion | Open the door or drawer through its full travel | Confirm the hand can grip and operate the front without contacting adjacent parts |
| Visual system | Check scale and alignment across the cabinet run | Check length, orientation, repeated spacing, and visual balance |
| Service | Confirm fastener access and replacement availability | Confirm both fixing points and the correct replacement fastener set |
The best choice depends on the cabinet front, user, intended motion, project style, and installation plan. Do not state that pulls are always more ergonomic or that knobs are always easier to install. A grip trial on a representative door or drawer is a more useful buyer check than a general preference.
How Should Buyers Compare Grip and Cabinet Operation?
Use the actual cabinet or a representative fixture to compare how the hardware is approached and operated. A knob may require a pinch or grasp around a projection; a pull may offer a longer contact area. What feels comfortable depends on hand size, projection, edge radius, installation location, load in the drawer, and whether the user approaches from above, below, or the side. The product team should test the experience for the intended user and application instead of applying an unsupported ergonomic rule.
Review these conditions with a sample:
- Can the user reach the grip when the cabinet is in its normal position?
- Does the grip provide enough finger clearance for the intended hand approach?
- Do adjacent doors, frames, countertops, appliances, or walls interfere during operation?
- Does the knob or pull contact another front when a door opens fully?
- Can the drawer be opened smoothly when it contains the expected product load?
- Are corners, edges, caps, and fastener heads comfortable and consistent with the product specification?
- Can the intended user distinguish an operating grip from a decorative detail?
These are evaluation prompts, not a substitute for an accessibility standard or a user study where one is required. A product intended for commercial, hospitality, healthcare, or accessible applications may have additional project-specific requirements. The buyer or design professional should identify those requirements and test the correct configuration.
When a product comes in multiple projections or grip shapes, compare them on the same cabinet surface. A larger grip may offer a different hand approach but may also project further into an aisle or conflict with adjacent fronts. A smaller knob can preserve clearance yet be less convenient for some users. The trade-off should be reviewed with the intended use and panel geometry in view.
Structure the grip trial so the result can be repeated. Mount each candidate in the same cabinet-front location, use the same opening direction, and test with the drawer or door both empty and in its expected loaded state. Ask the intended user to operate the front naturally rather than prompting them to hold a particular part of the handle. Record whether fingers contact the panel, whether neighboring fronts collide, and whether the user needs to change hand position during the opening motion. If the cabinet will be used by several groups, include the relevant users in the review instead of relying on one designer’s preference.
The trial should also distinguish the hardware from the cabinet mechanism. A drawer that binds or a hinge that closes unexpectedly can make a good grip appear poor. Verify that the cabinet movement itself is representative before comparing samples. If the user’s feedback points to projection or hand clearance, record the actual product dimension and cabinet condition that produced the issue. This turns a subjective statement such as “the pull feels awkward” into a question the product team can investigate without claiming a universal ergonomic threshold.
How Do Fixing Points Affect Hole Reuse and Installation?
The number and spacing of holes determine whether hardware can reuse an existing cabinet front. A one-point knob may not align with a two-hole pull layout. A pull’s nominal length is also not necessarily its fixing distance. Measure center to center between the actual mounting holes and compare that dimension with the drawing or product specification; do not use the overall length as a substitute.
For new product development, define the hole pattern before the cabinet panel is drilled. Record the datum, front orientation, edge distance, hole diameter, fastener access, and approved tolerance in the controlled drawing or drilling template. The details depend on the cabinet construction and hardware design; this article does not set universal dimensions or drilling locations.
Review the template as a manufacturing control. Confirm that the tool references the correct edge or centerline, that its orientation is clear, and that the same reference can be used for left- and right-hand doors where intended. A template that fits one sample but can be rotated or shifted into an unintended position may create inconsistent hole locations across a production run. Mark the drawing revision and panel reference on the controlled template, and replace obsolete copies when a spacing or datum changes.
For multi-hole pulls, measure from the centers of the actual fixing holes on the technical drawing or a sample. Do not estimate center-to-center from the outer ends of the handle. If a replacement program allows more than one pull length, define each spacing separately and make sure the product listing distinguishes the patterns. A user can accept a different overall handle length while still needing the same hole spacing; conversely, two handles with a similar overall length can require different holes.
For replacement or renovation programs, map the existing holes and identify the panel material and thickness. The buyer should not assume that a visually similar pull matches the installed hole spacing. If new holes are proposed, confirm that they do not conflict with panel edges, frame members, drawer boxes, reinforcement, or concealed hardware. A mock-up can show whether the fasteners and rear clearances work before the supplier makes a larger quantity.
Amerock’s cabinet hardware installation template is one example of a product-specific positioning aid that supports knobs and selected pull center-to-center sizes. Its listed compatible sizes apply to that template and product scope; they are not a universal cabinet drilling standard. Buyers should use the chosen hardware’s technical drawing and installation instructions to verify the actual mounting pattern.
If the project uses a shared hole pattern across several SKUs, record the compatibility matrix. Confirm which knobs, pulls, backplates, and fasteners truly share the pattern and which are only visually coordinated. A finish family does not imply interchangeable holes. This matters for retailers and distributors who promise replacement compatibility across a product assortment.
What Should a Buyer Check on a Door or Drawer Mock-Up?
Approve the hardware on a representative panel, not only as a loose component. The mock-up should use the panel material, thickness, edge profile, finish, and fixing method planned for the product. If a pull has two fixing points, mount both. If the knob includes a washer, backplate, insert, or special screw, use the production-intent parts so the projection and fit are representative.
| Mock-up check | How to review it | Record for approval |
|---|---|---|
| Fixing location | Compare the hole pattern with the drawing and template | Datum, dimensions, and panel revision |
| Grip and projection | Operate the front through its expected travel | Sample ID and user review notes |
| Adjacent clearance | Test at corners, neighboring fronts, walls, and appliances | Interference location and accepted clearance |
| Fastener fit | Confirm the screw or insert matches the panel and hardware | Fastener code and actual panel thickness |
| Finish and contact | Inspect visible faces and areas that touch the panel | Approved finish sample and protection detail |
| Repeatability | Compare multiple fronts or positions if the program requires it | Number of samples and any variation |
Do not approve only one knob on one square coupon if the product will be used across doors and drawers with different widths, frame details, or opening directions. The buyer can select a representative set of panels that exposes the main fit and use conditions. If the sample does not match production material or hardware, record the limitation and repeat the approval with the corrected configuration.
Also review the service path. Can a user tighten or replace the fastener without damaging the front? Does the supplied screw length fit the approved panel? Are spare screws, washers, or backplates identified by part number? A sample that looks correct from the front may still have an installation issue on the back side or inside a drawer.
How Should a Buyer Plan a Mixed Knob and Pull Assortment?
An assortment can combine knobs and pulls for different cabinet functions, but the system should have a deliberate layout. Decide which products are intended for doors, drawers, tall fronts, or paired fronts, then test the interaction with the actual cabinet design. The same model may not suit every panel width, edge, or installation height.
Create a simple schedule for each cabinet-front type:

- Front identification and opening direction.
- Hardware type and item number.
- Fixing-point count and hole spacing.
- Center location or reference datum.
- Projection and neighboring clearance requirement.
- Fastener and panel thickness compatibility.
- Finish and approved sample reference.
- Template or drilling instruction and its revision.
This schedule helps avoid a common sourcing mistake: ordering visually coordinated knobs and pulls before checking whether the hardware, fasteners, and cabinet fronts form a workable set. A collection may use similar finishes while each product has different fixing dimensions. Ask the supplier for a drawing and actual mounting hardware for each SKU, not only a catalog image.
For private-label programs, keep the assortment data connected to packaging and installation documents. The customer should know which fasteners belong to which product and whether the cabinet front requires one or multiple holes. If a retailer offers replacement pulls, it should distinguish overall length from center-to-center spacing in the product information so buyers can compare the fixing pattern accurately.
Decide whether the assortment should prioritize shared components or a broad choice of forms. Shared screws, finishes, backplates, or templates may simplify inventory, but only when they genuinely fit the selected products and panels. Do not advertise interchangeability because two handles share a finish or collection name. Verify the part numbers, fixing dimensions, thread or insert system, and panel compatibility for every item that is included in a replacement family.
For e-commerce or distributor catalogs, show the mounting dimensions beside the visual image and identify whether the measurement is overall length or center-to-center spacing. If a product uses a single point, state the required hole arrangement from its approved technical record. Avoid adding a drilling dimension from a retailer’s template unless that value is confirmed for the exact SKU. Clear product data helps reduce returns caused by a customer ordering a visually similar item that does not fit the existing cabinet holes.
What Information Belongs in the RFQ?
An RFQ should define the intended use, cabinet-front geometry, mounting layout, finish, quantity, sample requirements, and packaging needs. Attach the current drawing, the panel thickness and material, any existing hole pattern, and the desired hardware configuration. If the buyer is comparing knobs and pulls, specify whether the comparison is for appearance, grip, replacement fit, new product development, or an assortment decision.
Use this RFQ checklist:
- [ ] Door and drawer panel drawings, revisions, materials, and thicknesses.
- [ ] Hardware form: knob, pull, or another specific mounting style.
- [ ] Number of fixing points and center-to-center dimension where applicable.
- [ ] Hole location datum and approved drilling template.
- [ ] Required projection, finish, visible faces, and sample reference.
- [ ] Fastener type, length, inserts, washers, and installation access.
- [ ] Intended cabinet motion and representative clearance conditions.
- [ ] Sample quantity and mock-up panels for approval.
- [ ] Packaging, labeling, spare parts, and installation instructions.
- [ ] Inspection records or acceptance criteria required for the project.
If the buyer has not settled the layout, request a feasibility sample or drawing review rather than asking a supplier to choose the design without approval. The factory may propose options, but the buyer should confirm the selected configuration and its fixing pattern before drilling production panels.
For the cabinet knobs vs pulls decision, keep the comparison record with the sample approval and purchasing specification. Record the model, finish, projection, hole pattern, fastener set, panel reference, and the user or installation condition reviewed. If the product changes after the sample is approved, repeat the fit check when the change affects the grip surface, mounting geometry, panel thickness, or hardware supplied in the package. A visually similar revised part should not inherit the previous approval automatically.
When a cabinet run combines several fronts, identify each type in the schedule and show where the approved knob or pull is used. This reduces mistaken substitutions during purchasing, assembly, and replacement ordering.
How Can a Small-Batch OEM Factory Support the Selection?
A small-batch OEM factory can help translate the buyer’s drawing, panel sample, appearance target, and fixing requirements into a clear product-development discussion. Koitor Hardware is a family-owned custom metal hardware factory focused on bathroom and home-storage products. Its approved facts support customization from drawings or physical samples, manufacturing discussion, finish requirements, assembly, and packaging preparation. They do not establish that Koitor manufactures every cabinet knob or pull design, or that a particular design will suit every cabinet user.
For a project review, share the cabinet-front drawing and sample, intended grip and opening motion, hole pattern, panel thickness, target material and finish, quantity, packaging, and any installation constraints. The supplier can help identify missing dimensions, a fastener question, an access conflict, or a sample detail that needs confirmation. The buyer retains control of the selected layout, design requirement, and acceptance criteria.
A trial order can help a buyer review a new assortment before expanding it, provided the samples reflect production-intent materials, fixing parts, and finish. Depending on product, MOQ can start from 100 pieces; samples usually take 5–7 working days after details are confirmed, and bulk production usually takes 4–6 weeks depending on quantity, finish, and packaging. These are planning ranges and should be reconfirmed for the actual scope.
Review the OEM home-storage hardware manufacturing scope and send the drawing or panel sample through the Página de contacto do Koitor. Include the fixing layout and describe which user or installation question remains open.
Perguntas frequentes
Are cabinet knobs easier to install than pulls?
Not in every project. A knob commonly uses one fixing point, while many pulls use multiple points and a defined spacing. Installation effort depends on the cabinet layout, drilling template, fastener access, panel material, and production controls.
Does the overall length of a pull tell me its hole spacing?
No. Measure the distance between the actual mounting-hole centers and compare it with the technical drawing. The overall length and center-to-center dimension are different product attributes.
Can I replace two-hole pulls with knobs?
Possibly, but the existing holes may remain visible or require an approved repair or backplate. Confirm the panel condition, desired appearance, and installation plan before selecting a different fixing pattern.
Are pulls always more comfortable than knobs?
No universal comfort ranking applies. Grip depends on the handle shape, projection, location, user, cabinet motion, and surrounding clearances. Evaluate a representative sample with the intended users and application.
How should I choose the placement for a cabinet knob?
Use the cabinet-front drawing, project design requirements, and a repeatable template. Confirm the location on a mock-up before drilling production fronts. This article does not prescribe a universal placement dimension.
What does center-to-center mean for a cabinet pull?
It is the distance between the centers of the pull’s mounting holes. Confirm the exact dimension in the product specification and compare it with the cabinet’s existing or planned holes.
What should be included with the sample?
Include the actual hardware, production-intent fasteners, panel sample, finish reference, and drawing revision. A loose decorative sample cannot confirm the complete installation fit.
Can an OEM factory decide the hole layout?
The factory can review feasibility and suggest options, but the buyer or authorized designer should approve the final hole pattern and cabinet-front requirement. Record any accepted change in the controlled drawing.
Trabalhe com a Koitor Hardware
Share the cabinet-front drawing, panel sample, desired hardware type, fixing pattern, and finish reference. Koitor can help clarify the manufacturing and sourcing scope; the buyer should approve final layout and installation requirements.
Choose the Grip and Hole Pattern on the Same Sample
Send a cabinet drawing or panel sample, the intended grip, and the fixing layout for a project review.
OEM / MARCA PRÓPRIA
Transforme este guia de fornecimento num resumo do produto
Indique o produto pretendido, as dimensões, o acabamento, a quantidade a encomendar e os requisitos de embalagem. A sua equipa receberá uma análise prática da viabilidade de fabrico antes da apresentação do orçamento.


 English
 Español
 Português
 Français
 Deutsch
 العربية