

Cabinet knob placement should be decided from the door or drawer construction, the way the front opens, and the actual knob’s shape before a hole is drilled. A customary corner position can be a useful starting point, but it is not a universal rule for every slab, framed door, drawer front, overlay, or knob. Select a reference edge or rail, mark the intended hole center, mock up the knob, and check clearance through the full opening motion.
For a buyer, cabinet maker, or private-label team, the key is to make the location repeatable. Record the datum, hole center, knob envelope, front thickness or backing condition where relevant, template revision, and approved sample. That record lets a second door or production lot follow the same approved layout. It also helps distinguish visual preference from checks that prevent collisions, misplaced holes, or an unsuitable mounting interface.
What Should Be Decided Before Marking a Hole?
First identify the cabinet front and its construction. A slab door has no raised perimeter rail, while a framed or paneled door has rails and stiles that can influence both appearance and available mounting area. A drawer front may be shallow, thick, applied to a separate drawer box, or part of a nested front arrangement. These constructions change which edges are visible and where the knob can be reached. Do not copy a location from a different door style without checking the actual front.
Next identify how the door or drawer moves. A hinged door swings through a path and can approach an adjacent wall, another door, or a side panel. A drawer travels outward and may pass a nearby handle, appliance, or countertop. The knob has a three-dimensional envelope: face diameter, projection, base shape, and any decorative feature can affect collision and finger clearance. A small flat knob and a projecting mushroom knob can have very different interactions even if their hole uses the same screw.
Decide the user action that the knob should support. The location should allow the expected user to grasp and operate the front without placing the hand against a sharp edge or another fitting. For a pair of doors, consider whether the knobs sit near the meeting edges or closer to the outside edges, and check whether one door’s knob interferes with the other. Those decisions may be guided by a designer or product owner; they are not solved by one universal offset.
For an assortment or production order, confirm whether the buyer is approving a single product or a family with multiple front sizes. A location that looks balanced on one door may not scale proportionally to a much narrower front. Define whether the hole center is controlled from an edge, rail, corner, template, or drawing coordinate. Use the same datum language in the drawing, installation sheet, and purchase approval.
Cabinet knob placement should also be reviewed in the context of the complete room, especially when a cabinet front opens beside a wall or appliance. Identify which side carries the hinge, whether the door overlays the cabinet side, and how far the front projects when open. A knob near the opening edge can be easy to reach, but its projection may contact an adjacent door or wall. These checks depend on the cabinet dimensions and hardware, so use a real layout rather than a generic offset.
For drawers, note whether a decorative front is attached to a box or whether the front itself provides the mounting thickness. A centered location can be visually balanced, but the back may contain a box side, fastener, or other obstruction. Confirm the mounting screw and available depth from the actual assembly. If two drawers sit close together, check that the knobs do not collide when both are pulled. A family rule should specify how such exceptions are reviewed.
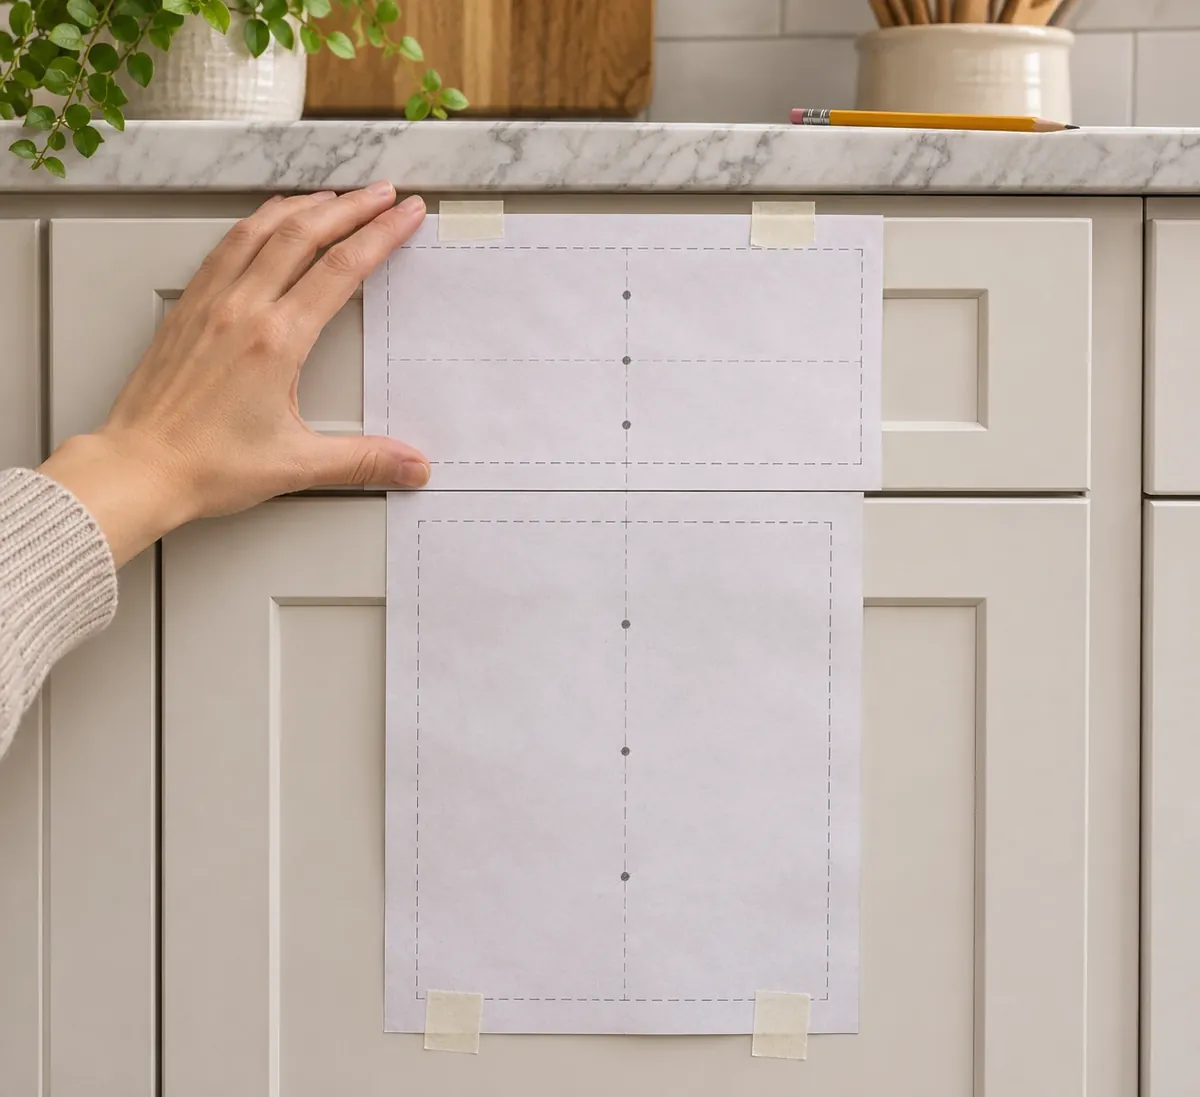
How Do Door and Drawer Datums Work?
A datum is the reference from which a location is measured. For a cabinet knob, it may be the top or side edge of a door, the inside edge of a stile, the boundary of a drawer rail, or a controlled coordinate on the drawing. State the point on the knob that is being located, usually the center of the mounting hole, and the reference that controls it. Saying “near the corner” leaves the location open to interpretation.
For a framed door, a buyer may choose to align the knob center with a rail or stile reference, but the actual front should be measured. Decorative profiles, bevels, and raised panels can make the visually apparent edge differ from the structural region suitable for fastening. Check the back of the front for clearance and confirm the maker’s mounting instructions. Do not drill into a thin profile or a hidden feature based only on a front-view photograph.
For a slab door, position can be referenced from its top and side edges or from a project-specific coordinate. The distance may differ depending on door width, hinge side, and surrounding trim. For a drawer front, the center may be visually balanced while still allowing the user’s hand to access it. If a drawer front is unusually tall or has a rail profile, inspect both the front view and the rear mounting surface before choosing a hole center.
When multiple fronts repeat, document the datum hierarchy. For example, the family drawing can define one standard location rule and identify explicit exceptions for narrow doors or special drawers. Avoid mixing a dimension to the hole center on one drawing with a dimension to the knob edge on another. A manufacturer or installer should be able to reproduce the location without interpreting a mood board or guessing which visible line was intended.
Two dimensions from an intersecting pair of edges can define a hole center, but the chosen edges must be unambiguous. A drawing should identify finished edges rather than an unfinished substrate or a decorative reveal that changes between versions. If the dimension is taken from a rail centerline, show how that centerline is determined on the actual front. This is particularly important where profile shapes hide the boundary or where applied trim is separate from the structural door.
For an overlay cabinet, the closed front position can disguise the cabinet frame behind it. A visually attractive knob location may place the screw close to a frame edge or a hinge cup. A section or rear view can show these constraints better than a front elevation. Ask the cabinet maker to confirm backing and hinge clearance before releasing the hole layout. Do not assume that a front-view coordinate proves enough material exists behind the face.
How Should a Buyer Compare Suggested Placement Rules?
Manufacturer, cabinet designer, and retailer guides may show common placement options. San Diego Hardware distinguishes door styles and presents placement advice as suggestions rather than strict rules; CliqStudios likewise treats placement as both functional and visual. Such guidance can help generate a mock-up, but it does not become a requirement for a different cabinet construction or product. The door drawing, knob dimensions, project preference, and actual clearance determine the final location.
| Front type or layout | Candidate reference | What to check before approval |
|---|---|---|
| Slab door | A defined distance from the top and opening-side edge | Hinge swing, adjacent fronts, knob projection and visual balance |
| Framed or paneled door | A rail or stile reference chosen on the drawing | Usable mounting area, profile geometry, backing and edge distance |
| Drawer front | A centerline or project-specific position | Hand access, drawer motion, neighboring hardware and front construction |
| Narrow front | A reviewed exception to the family rule | Collision, available material around the hole and appearance |
| Paired doors | A consistent rule relative to each opening edge or meeting edge | Door-to-door collision and clear access to both knobs |
Use the table to organize a review, not to import an unverified numerical offset. If a supplier proposes a customary location, ask which front geometry and hardware envelope it assumes. The buyer should record whether the location is a design preference, a manufacturing constraint, or a user-access requirement. Keeping those reasons separate makes later revisions easier to understand.
Suggested locations can also use different origins. One guide may measure from an outside corner, another from a rail or stile, and a third may show a proportional position on a drawing. These can produce different hole centers even when each illustration appears reasonable. Before comparing advice, redraw the proposal on the exact front and identify the measured edges. If a seller gives a recommendation without a named datum, treat it as an illustration rather than a production instruction.
The visual preference should be approved with the whole front set. Repeating the same absolute offset on two doors of different widths can create different visual relationships, while using a proportional rule can move the knob close to a profile or hinge. A product designer may choose either method based on the collection. Record the selected rule and its exceptions so installers do not have to improvise from product photography.
How Can You Check the Knob Envelope and Opening Motion?
Use the exact knob or a dimensionally representative sample. Measure the base diameter, face width, projection from the front, and any feature that extends beyond the mounting center. A drawing may show a nominal knob size but omit a decorative edge or angled projection. Compare the complete envelope against the door edge, a neighboring front, trim, wall, or appliance. For an angled or unusually shaped knob, check its orientation as well as its hole position.
Mock up the selected location using a removable template, paper overlay, or sample front. Mark the hole center, place the knob in the intended orientation, and move the door or drawer through its normal travel. Check the gap when adjacent doors are both open and closed. A location that is clear when the front is shut may collide during movement. For a bank of drawers, check the hardware on neighboring fronts at the same time.
Think about the hand path. Confirm that the user can approach and grasp the knob without hitting a nearby wall or another handle. For a paired door, check whether the two knobs overlap or make it awkward to pull one front without the other. This is a fit and usability check, not a substitute for an accessibility review where regulated or universal-design requirements apply. If a project has such requirements, use the current applicable specification and qualified review.
Also review the hole and fastener interface. The knob screw length, front thickness, backplate or washer, and any internal reinforcement must be compatible. Existing Koitor content on handle projection and finger clearance addresses the component projection question; this article addresses where the knob is located on the front. Keep the two decisions coordinated, but do not confuse a clearance specification with the hole-center position.
Check the product in both its closed and open positions. A knob may clear the adjacent front when both doors are closed but strike the opposite knob as one door swings. A corner location may also put the user’s fingers against a side panel before the door opens enough to reach into the cabinet. The relevant clearance depends on the hinge, overlay, opening angle, and the knob’s full shape. Mark the opening arc or use a physical mock-up to identify the issue before drilling.
For drawers, inspect the path beside neighboring fronts and any protruding worktop edge. A knob’s projection can affect whether the drawer can be pulled without knuckles contacting an adjacent surface. If the cabinet is installed in a tight corridor, check how the open drawer and user occupy the space. These are context checks for the proposed layout; they do not establish a universal ergonomic dimension. Projects with formal accessibility requirements need a separate current standards review.

What Should a Repeatable Layout Record Include?
A useful layout record names the front, datum, hole center, hardware, template, and approval state. The image or installation sheet should correspond to the same drawing revision. If a buyer approves a sample and later changes the knob, review the envelope and location again. Changing only the face diameter can affect collision even when the center hole stays fixed.
| Record field | Example of what to identify | Why it matters |
|---|---|---|
| Cabinet front | Door or drawer ID, width, height and construction | Defines the surface and usable region |
| Reference datum | Named edge, rail, stile or drawing origin | Makes the position reproducible |
| Hole location | Center point dimensions or coordinates | Prevents ambiguous “near the corner” instructions |
| Knob model | Part number, base, face and projection | Defines the envelope that must clear adjacent parts |
| Mounting interface | Hole size, screw and front thickness requirements from approved drawing | Confirms the selected front can accept the hardware |
| Template | File or physical template revision | Keeps drilling and installation aligned with approval |
| Sample disposition | Approved sample and date or unresolved issue | Links the decision to the item reviewed |
This record is especially useful when a project uses repeated cabinet fronts or when a distributor supplies a private-label installation guide. If a later version changes the door profile, knob, screw, or mounting plate, the team can identify which dimensions require review. Do not assume a previous approval carries forward automatically to a changed geometry.
For a set of fronts, list the affected part numbers and their exceptions explicitly. If the left and right doors use mirrored layouts, state whether the coordinates are referenced from each opening edge or from one common datum. A mirrored template can be accidentally reused in the wrong orientation; a written orientation note and clear drawing view reduce that ambiguity. Keep the released template filename and revision visible to the assembly or installation team.
The record can also distinguish a design-approved point from an inspection method. The designer may approve the location based on balance and user access, while quality staff verify that the production hole matches the released coordinates. State how the measurement will be made and which feature is the reference. This avoids asking incoming inspection to reinterpret a sketch or substitute its own preferred position.
How Should Product Teams Handle Exceptions?
A family-level placement rule is useful only when its assumptions remain valid. A narrow door may not have enough room for the typical location. A deep rail or decorative molding may change the usable flat area. A drawer may have an internal component or reinforcement behind the selected point. A pair of doors may require a different orientation to avoid impact. Record an exception for the affected front instead of forcing the standard location across every product.
For each exception, identify the reason, proposed alternative, and evidence needed for approval. A mock-up may show that the alternative clears adjacent doors; a section drawing may show that the screw has adequate material behind it; a physical sample may confirm the appearance. These checks answer different questions. A visual sample cannot by itself prove the hidden construction, and a drawing cannot establish that a customer prefers the appearance.
If a knob is moved after tooling, template creation, or sample approval, update all dependent records. This may include the front drawing, drilling template, hardware schedule, assembly instruction, package artwork, and any inspection sheet. Mark obsolete versions so they are not used at the production station or by the installer. A change can be small on the drawing and still produce visible inconsistency across a cabinet run.
Do not solve a layout issue by changing a fastener or drilling method without checking the exact product and front material. Backing, pilot requirements, edge distances, and screw engagement are product-specific. Follow the cabinet and hardware maker’s instructions, and use a qualified installer if the material or hidden construction is uncertain. This article does not prescribe a universal hole diameter or drilling process.
An exception should not quietly become a new default. If multiple fronts require the same deviation, review whether the family rule needs a defined variant. A narrower door might use a different location to keep the knob clear of a hinge or molding, but the product team should decide whether the visual difference is acceptable across a full cabinet run. Capture the reason and approved sample so the production team does not alternate between layouts from memory.
If drilling has already occurred, do not assume a nearby second hole is acceptable or that filler will restore the appearance or strength. The cabinet maker or qualified repair professional should assess the specific material, finish, and front construction. For a future run, update the released drawing and template and segregate superseded instructions. This article concerns planning and approval before drilling, not a repair specification.
How Can a Private-Label Buyer Control the Instruction?
The buyer should approve placement communication at the same time as the hardware sample. A diagram needs to show the correct front orientation, datum, and hole center. If a top or side edge is shown, clarify whether the view is from the room side or the back. Use a dimension line that terminates at the center of the mounting hole, and avoid an arrow that points to the knob face instead. A clean image can still be misleading if the dimension endpoints are wrong.
If the knob comes with a paper template, compare the template to the released drawing and physical sample. Verify that the template is not mirrored and that its edges correspond to the stated front datums. A template for a pull handle may use two hole centers; a single-hole knob has a different layout. Do not adapt a template from a similar product unless the dimensions and orientation have been formally checked.
At incoming or in-process inspection, check the location using the approved drawing and a suitable measurement method. Define the sample basis and acceptance tolerance through the product’s quality plan; this guide does not invent a universal hole-location tolerance. For a decorative front, the inspection may also need a visual comparison of repeated knob positions across the cabinet set. Keep these visual criteria distinct from dimensional controls.
When the hardware is packed separately from the cabinet front, identify who supplies the template and who confirms the location. A knob package might include a drilling guide, while a cabinet maker’s instruction may define a different front-specific position. Do not include both without resolving which is authoritative. The buyer should coordinate the cabinet drawing, knob instructions, and private-label artwork so each document refers to the same product revision.
Where more than one knob is included in a kit, verify the fastener count and any supplied template against the BOM. A missing or mismatched screw can lead an installer to substitute a length that does not suit the front. That is a kit completeness question separate from placement, but the package review can check both. Record any bought-in component owner and confirm changes before artwork or purchase orders are released.
Koitor Hardware’s approved information supports customization based on buyer drawings or physical samples and discussion of custom home-storage hardware. It does not establish that Koitor manufactures every cabinet knob style or that it performs cabinet installation. Confirm the actual project scope and responsible component supplier before making product-specific capability claims. A buyer can provide the front drawing, knob sample, intended opening action, finish, packaging, and instruction needs for a scoped discussion.
Frequently Asked Questions
Is there one standard cabinet knob placement?
No single position applies to every door, drawer, frame, knob, and room. Use the cabinet and hardware drawings, mock up the location, and confirm clearance and mounting conditions before drilling.
Should knobs go near the corner of a cabinet door?
That is a common design option, not a universal rule. Check the door construction, usable material, opening motion, adjacent fronts, and knob envelope before approving a location.
Where should a knob go on a drawer front?
Choose a defined center or project-specific position based on the front design and use. Record the datum and check the drawer travel and neighboring hardware.
Can the same location rule be used for every cabinet size?
Only if the family geometry supports it. Narrow or unusually framed fronts may need documented exceptions after a fit and backing review.
Should I drill before testing the knob position?
Use a removable mock-up or template first. Verify the sample, opening motion, adjacent clearances, and hidden mounting conditions before making a permanent hole.
Does knob placement determine finger clearance?
Placement and projection both affect the user’s hand space. Check the chosen hole center together with the exact knob projection and nearby surfaces; neither dimension alone answers the full clearance question.
What should a buyer send to an OEM supplier?
Provide the front drawing, knob sample or part data, proposed datums, opening motion, template revision, finish, and any inspection or package-instruction needs.
What if the approved knob changes?
Recheck its face, base, projection, screw, and surrounding geometry. Update the drawing and template if the new envelope changes the fit or approved location.
Work With Koitor Hardware
Share the front drawing or sample, intended knob, mounting location, finish, template, packaging, and inspection requirements. Koitor can discuss custom home-storage hardware scope; confirm the exact knob and installation conditions with the responsible product supplier.
Review the OEM home-storage hardware page and custom bathroom hardware manufacturing page. For project questions, use the contact page.
Approve the Knob Location Before Drilling
Send the front drawing, knob sample, chosen datums, opening motion, and template revision.
OEM / PRIVATE LABEL
Turn this sourcing guide into a product brief
Share your target product, size, finish, order quantity and packaging requirements. Your team receives a practical manufacturability review before quotation.


 English
 Español
 Português
 Français
 Deutsch
 العربية